Using the Push Notifications Mobile Service
The Push Notifications service allows you to send native push notifications to different mobile operating systems.
-
Code once and push notifications to iOS and Android.
-
Push notifications to defined groups.
-
Push notifications to either iOS only or Android only.
-
Push notifications to different variants of a mobile app.
-
Push notifications from different back-end apps to the same mobile app.
Currently the service supports:
The Push Notifications service offers a unified Notification Service API to the above mentioned Push Network Services. It can be seen as a broker that distributes push messages to different 3rd party Push Networks.
|
-
You understand Push Notifications.
-
You have logged into the OpenShift console and the Mobile Developer Console.
Push Notifications Terminology
This section describes terminology that is associated with Push Notifications.
- Push Application
-
A logical construct that represents an Mobile App, for example, Mobile HR.
- Push Notification Message
-
A simple message to be sent to a Push Application.
- Sender Endpoint API
-
A RESTful API that receives Push Notification Message requests for a PushApplication or some of its different Variants. The Server translates this request into the platform specific details and delivers the payload to the 3rd party cloud providers, which eventually might deliver the message to the physical device.
- Variant
-
A variant of the Push Application, representing a specific mobile platform, like iOS or Android, or even more fine-grained differentiation like iPad or iPhone. There can be multiple variants for a single Push Application (for example, Mobile HR Android, Mobile HR iPad, Mobile HR iOS free or _Mobile HR iOS premium). Each supported variant type contains some platform specific properties, such as a Google API key (Android) or passphrase and certificate (Apple).
- APNs
- Installation
-
Represents an actual device, registered with the UnifiedPush Server. User1 running HR Android app, while User2 runs HR iPhone premium on his phone.
- Administrative User Interface
-
(AUI) The Unified Push Admin UI Web UI that allows you manage Push Applications and Variants, view statistics and send Push Notifications to devices.
Setting Up the Push Notifications Mobile Service
Obtaining Firebase Cloud Messaging Credentials
This procedure describes how to obtain Firebase Cloud Messaging Credentials.
Before the Android application is able to receive the notifications, you must set up access to Firebase Cloud Messaging. The following credentials are necessary to set up Firebase Cloud Messaging for your app:
-
Server key
-
Sender ID
-
google-services.jsonfile containing the credentials required to connect your app to Firebase and Google services.
-
From the Project Settings screen, switch to the Cloud Messaging tab, where you can find the Server key and Sender ID (known in GCM as Project Number). There is also a Legacy server key but it should not be used for new projects.
-
Download the
google-services.jsonfile as described in the Google Documentation.
Obtaining Apple Push Notification Service Credentials
This procedure describes how to enable Push Notifications for your iOS application and get the credentials required for push from Apple.
-
Follow the official Apple guide to enable push notifications for your Xcode project.
-
Follow the official Apple guide to generate an APNs client TLS certificate and export the client TLS identity from your Mac.
Make sure to protect the p12 file with a password.
The exported p12 file with the password will be used later when binding your Mobile App to the Push Notifications.
Provisioning the Push Notifications Service
This section describes how to set up the Push Notifications Mobile Service.
-
Log into the OpenShift console.
-
Create a new project or choose an existing project.
-
Click Add to Project and choose Browse Catalog from the options.
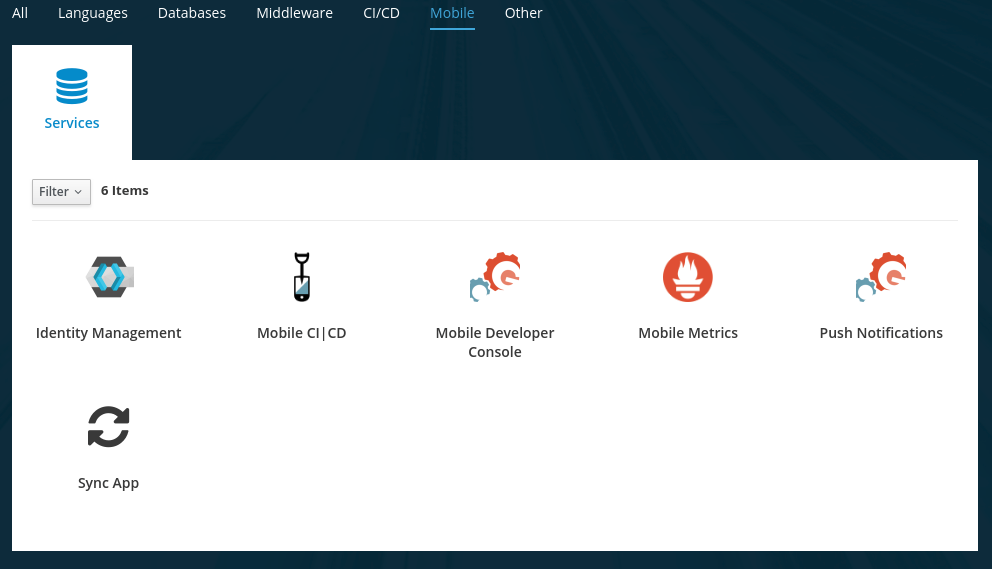
You can filter the catalog items to only show mobile specific items by clicking the Mobile tab.
-
Click Services and choose the service.
-
Follow the wizard for provisioning that service.
If prompted to Create a Binding, choose Do not bind at this time
Once the wizard steps are completed, navigate to the Project Overview in OpenShift to see the newly provisioned service. Provisioning a service may take some time.
Binding a Mobile App with the Push Notifications Service
To use mobile services, you must represent your mobile app in Mobile Developer Console, and that app must be associated with the mobile service. This association is called binding and it is necessary for your mobile app to use that service.
-
You have created a Mobile App.
-
Google account
-
Access to the Firebase console. Refer to Firebase Docs.
-
Apple Developer account
-
APNs client TLS certificate. Refer to official Apple guide.
To bind a Mobile App with a mobile service:
-
Log in to the Mobile Developer Console.
-
Click on the Mobile App on the Overview screen.
-
Navigate to Mobile Services tab.
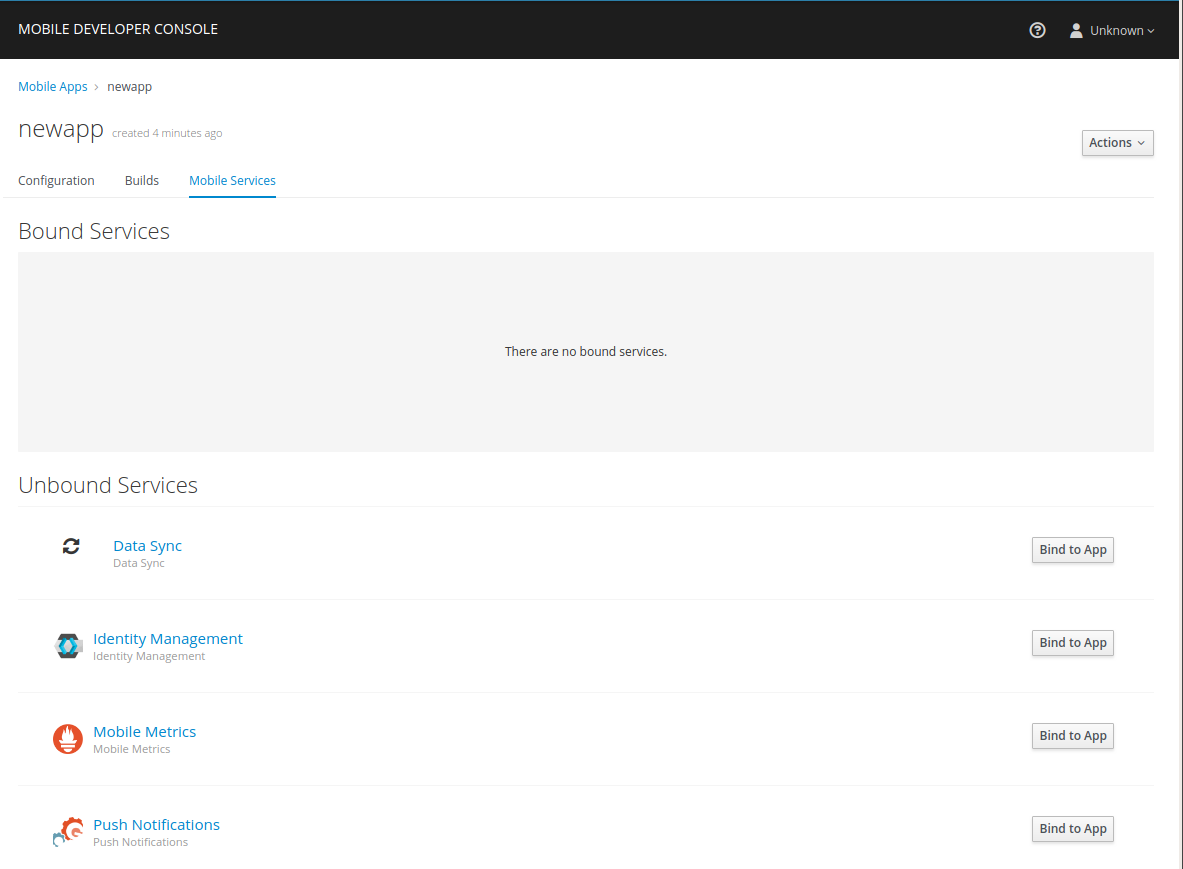
It is possible to bind a Mobile App with a mobile service in the OpenShift console, however such bindings are not valid for the purposes of this procedure. -
Press Bind to App in the Push Notifications.
-
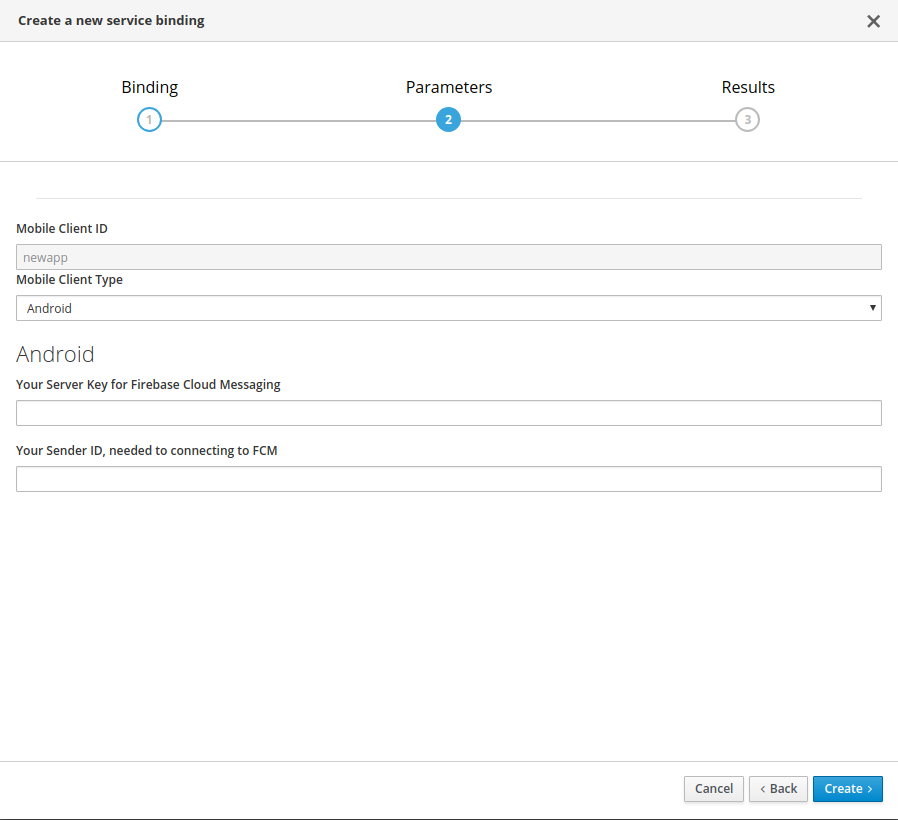
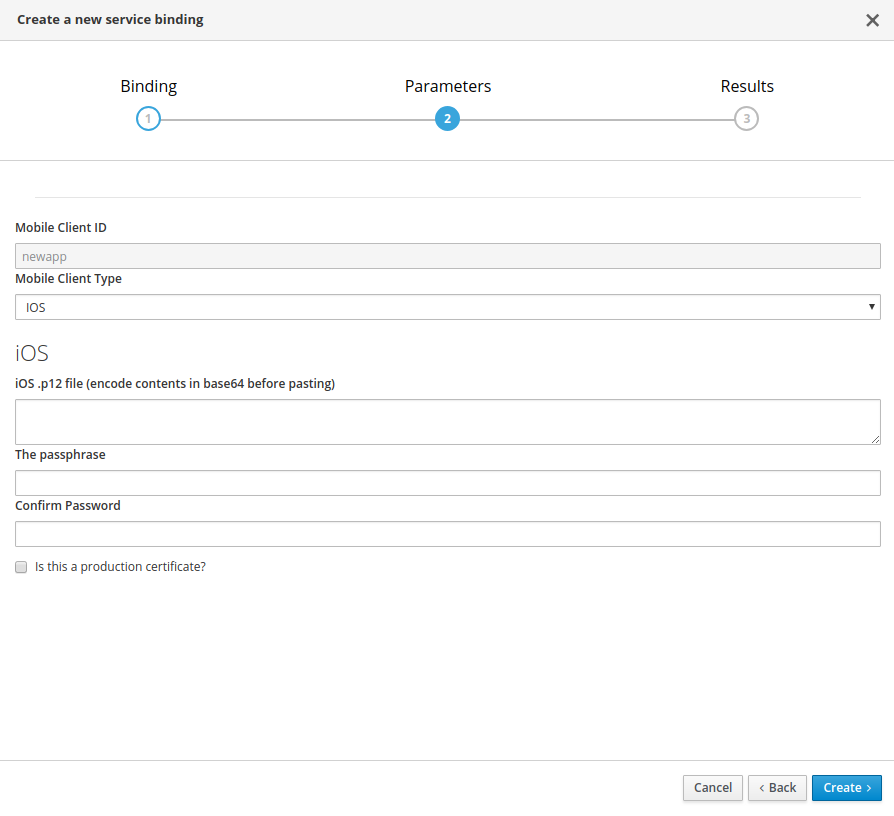
Fill out the binding parameters required by the Push Notifications Service.
When you bind a mobile client to the Push Notifications service, a variant is created to store the credentials required to communicate with a push network. Those credentials need to be provided in the binding dialog.
Choose a Mobile Client Type and fill out the required fields:
-
Select
Androidfrom in theMobile Client Typelist. -
Enter a Server Key and a Sender ID. Both are present in the Firebase console.
-
Select
iOSfrom theMobile Client Typelist. -
Obtain an APNs client TLS certificate. Refer to official Apple guide.
-
Encode the certificate using base64 and paste the encoded certificate into the field labeled
iOS .p12 file.If you are using macOS:
cat <path/to/your/.p12> | base64
If you are using Linux and a version of
base64that wraps lines, disable line wrapping as follows:cat <path/to/your/.p12> | base64 --wrap=0
After clicking Create your variant will be created in UPS and you should see a new binding for your mobile client. A variant is used for the storage of the credentials provided in the Binding procedure.
-
Configuring your client app
Downloading the Configuration File
The mobile-services.json file provides the information for your mobile app to communicate with services.
After you change any configuration in the Mobile Developer Console, it is important to update that file in your IDE.
-
The configuration of your Mobile App in Mobile Developer Console is up-to-date.
-
You have set up your mobile app development environment.
-
Open your Mobile App in Mobile Developer Console.
-
Copy the
mobile-services.jsonconfiguration to your clipboard. -
Save the contents of the clipboard to a new file called
mobile-services.json.The mobile-services.jsonfile is the link between your provisioned services on OpenShift and the mobile app you are developing. This file provides all required configuration to initialise the various SDKs and get them hooked up/connected to the back-end services. -
Move
mobile-services.jsonto the following location in your application project:app/src/main/assets/mobile-services.json<app directory>/mobile-services.jsonNOTE: Ensure thatmobile-services.jsonis a member of the project in the Xcode Project Navigator.src/mobile-services.jsonTo run the Cordova app on the Android device you also need to download the google-services.jsonfrom Firebase and put it on the root folder of your project.Resources/mobile-services.json
Setting up the Push Notifications Service SDK
This section helps you to set up the Push Notifications service SDK in your App. It describes how to set up and initialize the Push Notifications service SDK.
-
Your local
mobile-services.jsonfile is up-to-date.
An APNs service.
-
Import the libraries
-
Add the push dependency to your application module
implementation "org.aerogear:aerogear-push:1.0.0" implementation "com.google.firebase:firebase-messaging:[version]" -
Create a new project in Firebase console
-
Add The Google Services Gradle Plugin in your root
build.gradlefilebuildscript { dependencies { classpath 'com.google.gms:google-services:[version]' } } -
Apply the plugin in your app
build.gradlefile// ADD THIS AT THE BOTTOM apply plugin: 'com.google.gms.google-services'
-
Add the dependency to your Podfile
target '[TARGET NAME]' do pod 'AGSPush', '[VERSION]' end -
Update the dependencies
$ pod install -
Import the SDK
import AGSPush
-
Install
cordova-plugin-aerogear-push:$ cordova plugin add @aerogear/cordova-plugin-aerogear-push -
Install the Unified Push Server package needed for device registration:
$ npm install --save @aerogear/push
This feature is not yet supported in the AeroGear Xamarin SDK
-
Registering device on Push Notifications Service
To receive native push notifications from a Push Network, for example APNs or FCM, the mobile device is identified with a unique device-token assigned by that Push Network. This device-token is passed, by the operating system, to the mobile application. Refer to the operating system and Push Network documentation for further details.
Every time a user launches a mobile app, that app receives the device-token, from a platform-specific method (or callback).
Since the Push Network may assign a new token to a device, AeroGear recommends that the app registers the device-token with the UnifiedPush Server each time.
The required metadata for an Installation:
-
deviceToken: _Identifies the device/user-agent within its Push Network.
-
variantID: The ID of the variant, where the client belongs to
-
variantSecret: Password of the actual variant
The AeroGear UnifiedPush Server is able to store some user-specific metadata as well:
-
deviceType: The device type of the device or the user agent.
-
operatingSystem: The name of the underlying Operating System.
-
osVersion: The version of the used Operating System.
-
alias: Application specific alias to identify users with the system. For instance an
email addressor ausername. -
categories: Used to apply one or more "tags".
The device-token needs to be registered with the AeroGear UnifiedPush Server, to indicate there is a new Installation for a Variant. This registration is performed by calling an endpoint of the server.
-
Getting an instance of the PushService
PushService pushService = new PushService.Builder().openshift().build(); -
Registration request
pushService.registerDevice()
  .requestOn(new AppExecutors().mainThread())
  .respondWith(new Responder<Boolean>() {
    @Override
    public void onResult(Boolean value) { // Yay }

    @Override
    public void onException(Exception exception) { // Oops! }
});
func application(_ application: UIApplication,
                 didRegisterForRemoteNotificationsWithDeviceToken deviceToken: Data) {
    var config = UnifiedPushConfig()
    AgsPush.instance.register(
        deviceToken,
        config,
        success: {
           print("Successfully registered to Unified Push Server")
        },
        failure: { (error: Error!) in
           print("Failure to register for on Unified Push Server: \(error)")
        }
    )
}
import { PushRegistration } from "@aerogear/push";
new PushRegistration(app.config).register().then(() => {
// Registration with UPS successful, you can now send push notifications from the UPS UI
}).catch(err => {
// Error on device registration
});| Optionally, you can pass the parameters below to the register method |
{
  alias: 'some-alias',
  categories: ['one', 'or', 'more', 'categories'],
  timeout: 5000 // in milliseconds
}
This feature is not yet supported in the AeroGear Xamarin SDK
Sending a Push Notification using the Unified Push Admin UI
The Unified Push Admin UI allows you to send Push Notifications.
-
Make sure the Push Notifications service is provisioned.
-
Select a route in OpenShift.
-
Login with your OpenShift credentials.
| On first login you need to provide the OpenShift OAuth service permissions to read your user account. |
-
Open the Unified Push Admin UI in a browser.
-
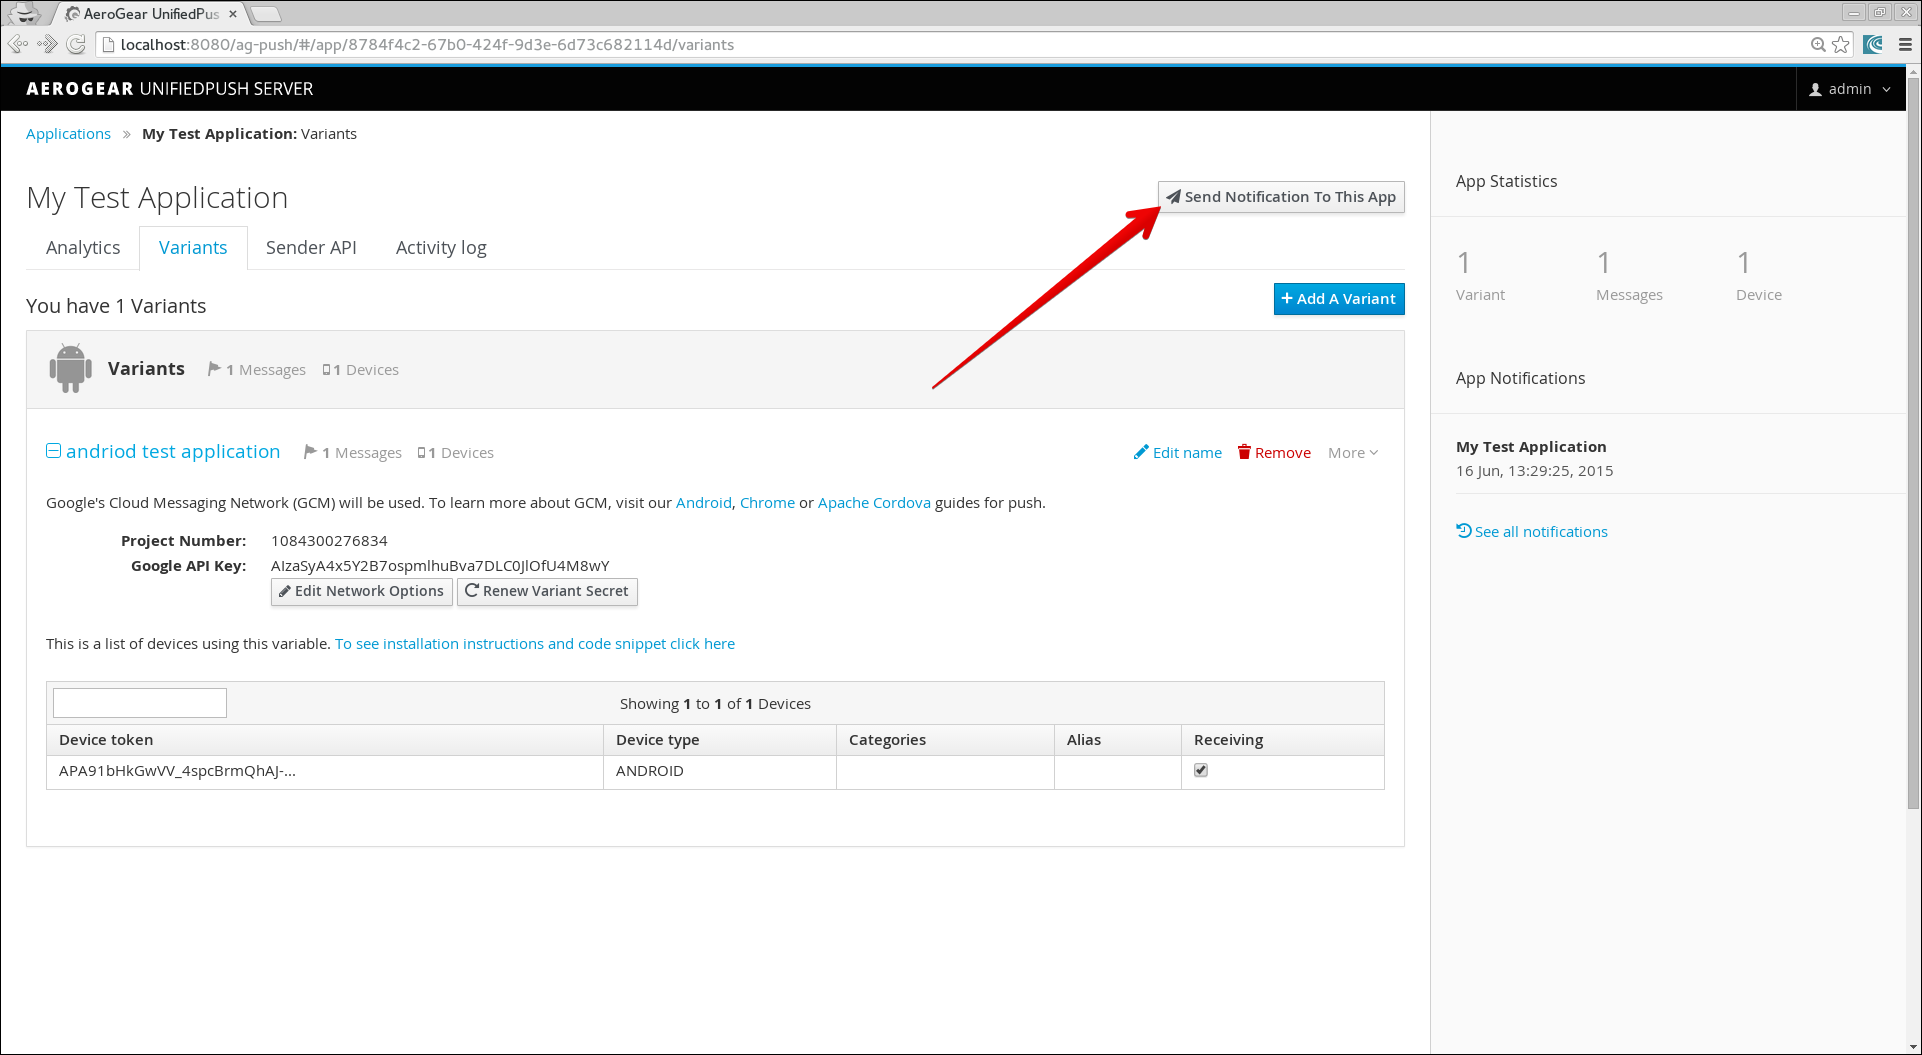
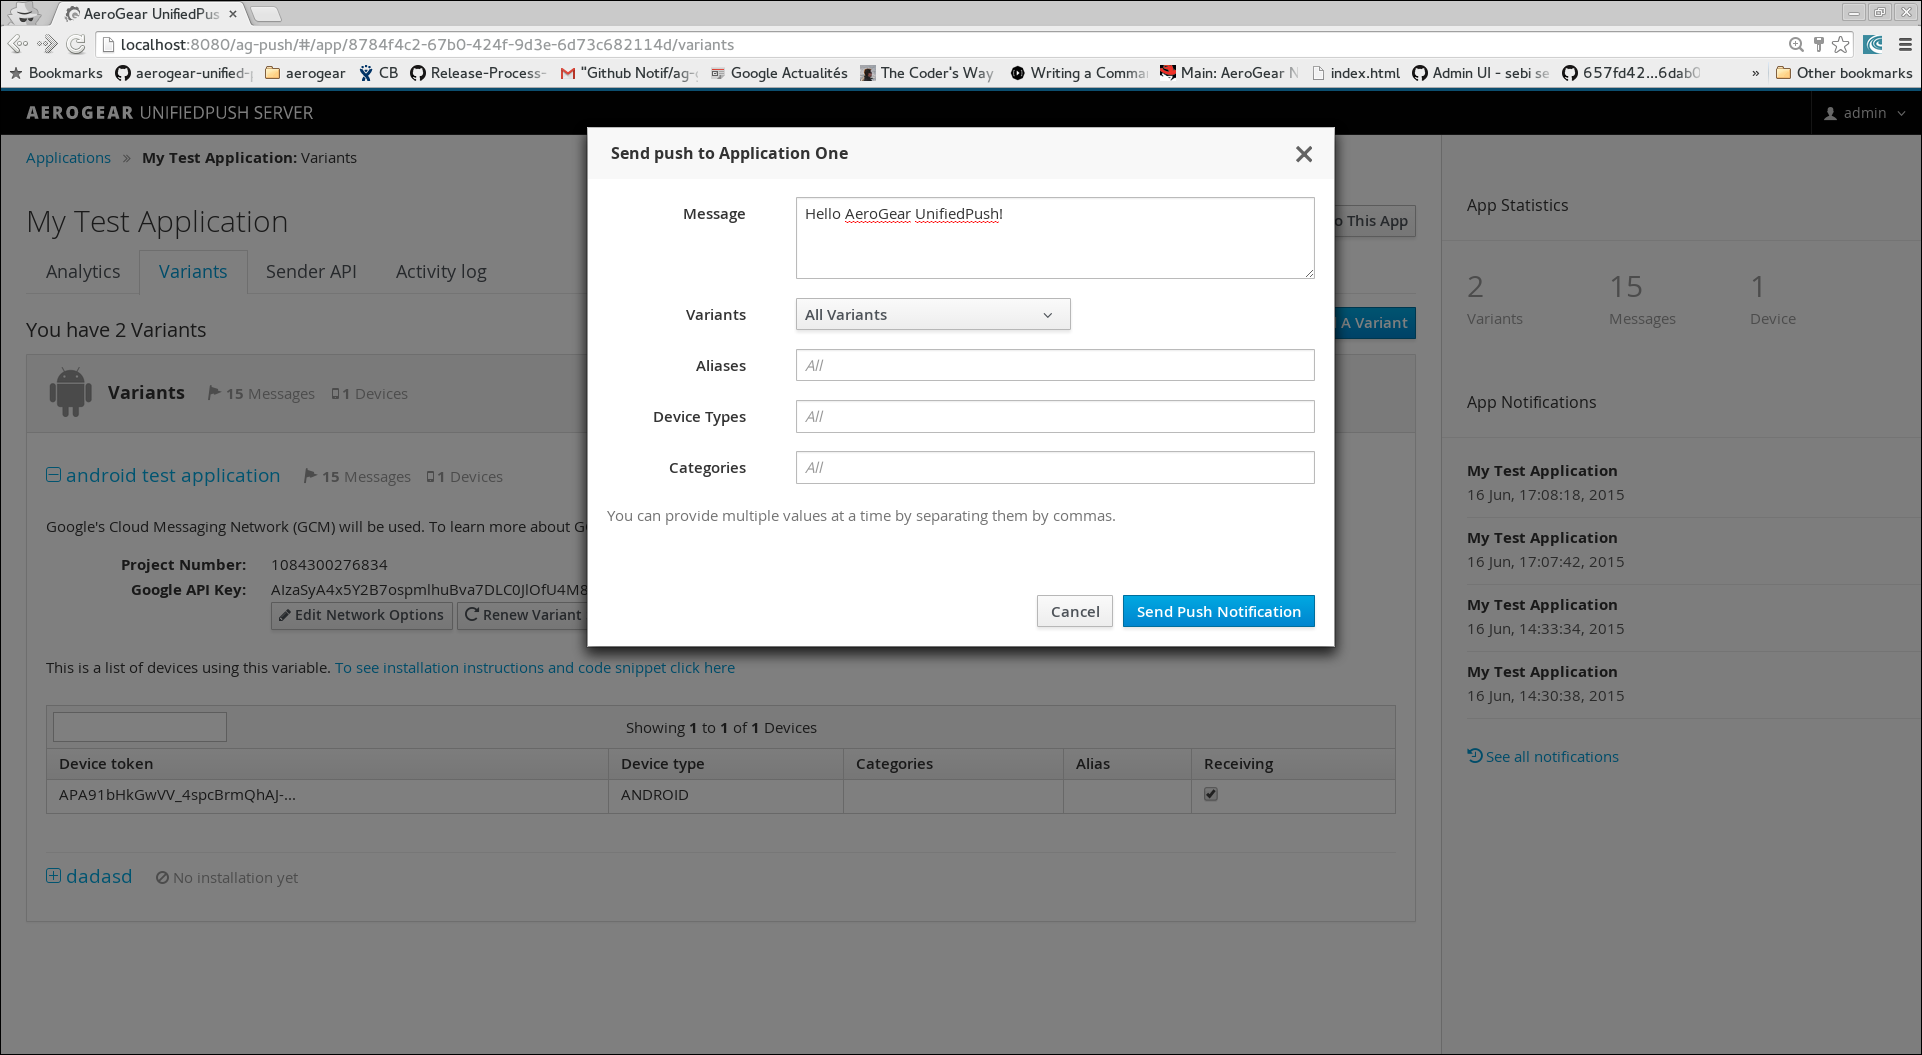
Select the target application from the home page and click Send Notification To This App.
-
When the Send Push dialog displays, enter text in the Message form.
-
Click Send Push Notification to send the message to the target application.
-
Add unifiedpush-java-client as a dependency to your project.
<dependency> <groupId>org.jboss.aerogear</groupId> <artifactId>unifiedpush-java-client</artifactId> <version>[version]</version> </dependency> -
Send the message to the target application.
final PushSender sender = DefaultPushSender
        .withRootServerURL("<pushServerURL e.g http(s)//host:port/context>")
        .pushApplicationId("<pushApplicationId e.g. 1234456-234320>")
        .masterSecret("<masterSecret e.g. 1234456-234320>")
        .build();

final UnifiedMessage unifiedMessage = UnifiedMessage
        .withMessage()
        .alert("Hello from Java Sender API!")
        .build();

sender.send(unifiedMessage, () -> {
    //do cool stuff
});
-
Add unifiedpush-node-sender as a dependency to your project.
npm i unifiedpush-node-sender -
Send the message to the target application.
const agSender = require('unifiedpush-node-sender');

const settings = {
  url: "<pushServerURL e.g http(s)//host:port/context>",
  applicationId: "<pushApplicationId e.g. 1234456-234320>",
  masterSecret: "<masterSecret e.g. 1234456-234320>"

};

const message = {
  alert: "Hello from the Node.js Sender API!"
};

const options = {
  config: {
    ttl: 3600
  }
};

agSender(settings).then((client) => {
  client.sender.send(message, options).then((response) => {
    console.log('success', response);
  }).catch((error) => {
    console.log('error', error);
  })
});
-
Send the message to the target application.
curl -u "<pushApplicationId>:<masterSecret>"  \
   -v -H "Accept: application/json" -H "Content-type: application/json"  \
   -X POST  -d \
  '{
     "message": {
      "alert": "Hello from the curl HTTP Sender!",
      "sound": "default"
     }
   }'  \
   <pushServerURL>/rest/sender
| The 3rd party Push Network is responsible for delivering the Push Notification to the target application. |
Handling Incoming Push Notifications
This section describes how to handle incoming push notifications in your foregrounded application.
| Push notifications that arrive when the application is in the background are always handled by the OS. |
Add to your project an implementation of MessageHandler:
public class MyMessageHandler implements MessageHandler {

    @Override
    public void onMessage(Context context, Map<String, String> message) {
        // Handle incoming message
    }

}
Add it to your application’s manifest.
<meta-data
    android:name="DEFAULT_MESSAGE_HANDLER_KEY"
    android:value=".MyMessageHandler" />
The AeroGear SDK for iOS does not provide a way to handle incoming messages. Instead, follow the Apple’s official documentation about notifications.
Add the following code to your app:
import { PushRegistration } from "@aerogear/push";

PushRegistration.onMessageReceived((notification: any) => {
  console.log('Received a push notification', notification);
});
This feature is not yet supported in the AeroGear Xamarin SDK