Running a Data Sync app on OpenShift
-
You have Docker installed on your local machine.
-
You have access to an OpenShift cluster with the Service Catalog.
-
You have completed the server getting started guide.
Overview
To connect your Data Sync server and client to other services, you need to run your application in OpenShift. Data Sync provides a service catalog item to help with this.
Data Sync requires your server application to be packaged as a Docker formatted container and published to a public respository such as Docker hub.
Building and publishing the Data Sync server container
To build a server into a container, create a Dockerfile in the project’s directory. This container will need to include your server source code, its dependencies, and be configured to execute your server.
As an example:
FROM node:10
WORKDIR /usr/src/app
# copy Node.js specific files
COPY package*.json ./
# copy application source file to the workdir
COPY index.js .
RUN npm install
# TCP port that application is listening on
EXPOSE 4000
CMD [ "node", "index.js" ]
Build the Docker container and tag it:
$ docker build . --tag <your-repo>/<container-name>Push your container to Dockerhub’s repository:
$ docker push <your-repo>/<container-name>Provisioning the Data Sync server applications using templates
Data Sync offers following OpenShift templates that will help developers with provisioning their DataSync applications to OpenShift platform.
Templates:
-
DataSync App
The DataSync App template allows developers to deploy the Node.js DataSync App on Openshift using source code only.
Node s2i is used to build the Data Sync App image.
NOTE: You must set the NODE_ENV environment variable to development and redeploy the pod to ensure access to the GraphQL playground.
The DataSync App can connect with other services running on OpenShift and can also connect to external data sources.
-
DataSync Showcase
Showcase application will deploy fully functional server with example Task implementation. Server side requires client application available on github aerogear/ionic-showcase
Note: Use the Showcase server template for demo purposes only. Do not use this template in a production environment.
When running on Red Hat Managed Integration templates will be available in Mobile > App category in OpenShift catalog
Templates along with documentation can be found in datasync-deployment repository.
Connecting a Client
-
You have access to an OpenShift cluster with the Service Catalog.
-
You have completed the OpenShift getting started guide.
-
You have created a mobile client and bound your data sync server.
-
You have completed the client getting started guide.
Once a service is bound to a mobile client, MDC will provide a mobile-services.json file that is used by the AeroGear client libraries to automatically configure the Data Sync client. It is very important that you use your version of this file and not the one used in this example as system specific values will be different.
Updating the Hello World Sync Client
The Hello World client application we wrote uses a hard coded server url. We need to remove this url and instead pass the mobile-services config to the client. We will also use the AeroGear core library to parse this file and pass that configuration to the Data Sync library.
const { init }  = require("@aerogear/app");

const core = init({
  "version": 1,
  "namespace": "myproject",
  "clientId": "getting-started",
  "services": [
    {
      "id": "0637bfd3-33aa-11e9-968e-52540014a8c2",
      "name": "sync-app-getting-started-getting-started",
      "type": "sync-app",
      "url": "https://sync-app-getting-started-myproject.192.168.42.138.nip.io/graphql",
      "config": {
        "websocketUrl": "wss://sync-app-getting-started-myproject.192.168.42.138.nip.io/graphql"
      }
    }
  ]
});
Once you have initialized the core, we can use it to configure the Data Sync client by setting the openShiftConfig property when we call createClient.
let client = await createClient({
    openShiftConfig:core.config
  });
And now, as before, we can use the client to make queries. A full example may look like the following code
import gql from 'graphql-tag';
const { init }  = require("@aerogear/app");
import { createClient } from '@aerogear/voyager-client';

const core = init({
  "version": 1,
  "namespace": "myproject",
  "clientId": "getting-started",
  "services": [
    {
      "id": "0637bfd3-33aa-11e9-968e-52540014a8c2",
      "name": "sync-app-getting-started-getting-started",
      "type": "sync-app",
      "url": "https://sync-app-getting-started-myproject.192.168.42.138.nip.io/graphql",
      "config": {
        "websocketUrl": "wss://sync-app-getting-started-myproject.192.168.42.138.nip.io/graphql"
      }
    }
  ]
});

async function helloWorld() {
  let client = await createClient({
    openShiftConfig:core.config
  });
  client.query({
      fetchPolicy: 'network-only',
      query: gql`{hello}`
    })
    .then( ({data}) => {
      console.log(data.hello)
    });
}

helloWorld();
Binding a Mobile App with the Data Sync server application service
To use Mobile Services, you must represent your mobile app in Mobile Developer Console, and that app must be associated with the mobile service. This association is called binding and it is necessary for your mobile app to use that service.
To bind a Mobile App with a mobile service:
-
Launch Mobile Developer Console
-
Click on the Mobile App on the Overview screen
-
Navigate to Mobile Services tab.
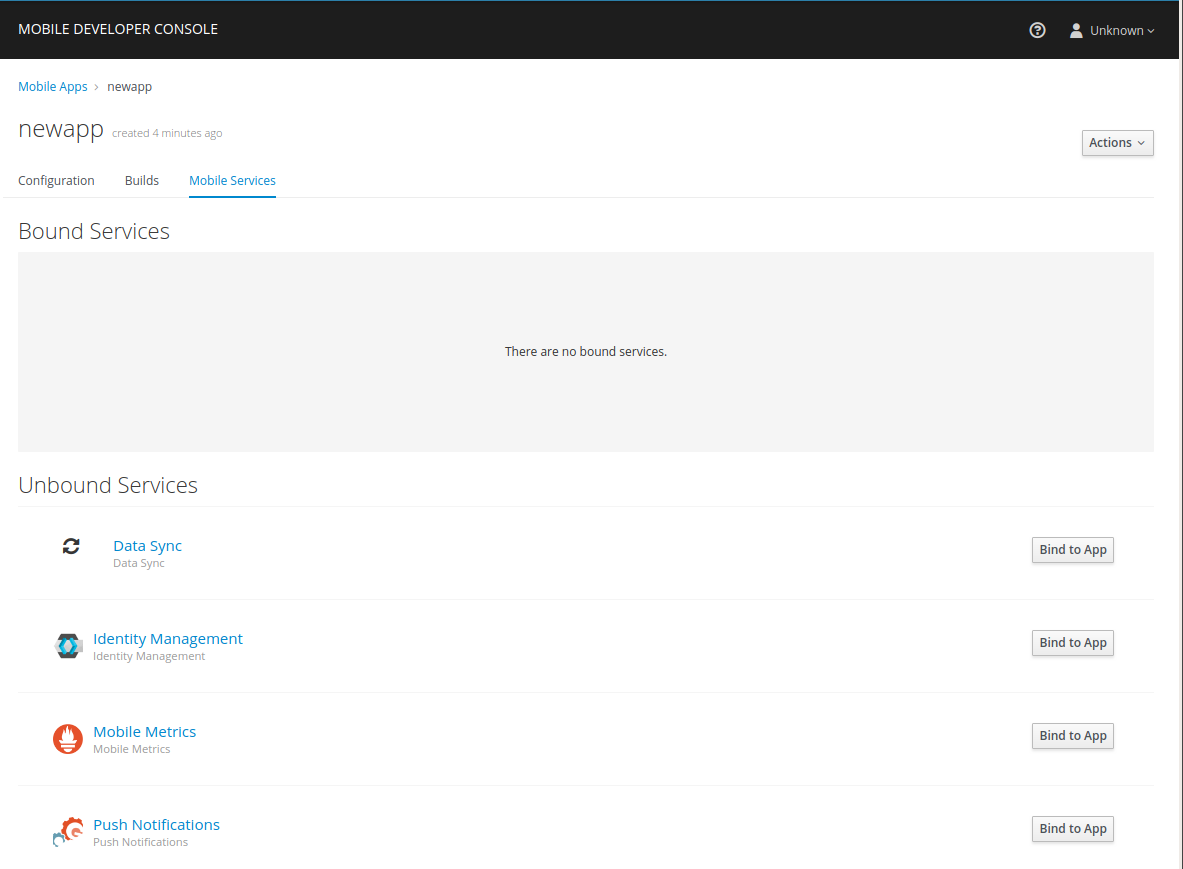
It is possible to bind a Mobile App with a mobile service in the OpenShift console, however such bindings are not valid for the purposes of this procedure. -
Press Bind to App in the
-
Fill out the binding parameters required by the Service.
Binding Data Sync to Identity Management
In this section, we will show you how to protect your Data Sync application using the Identity Management service.
-
There is a Identity Management service available.
-
You have provisioned a Data Sync application using our playbook.
-
oc tools must be installed
Any application that connects to Identity Management must consume a keycloak.json file. This section demonstrates how to add a keycloak.json file to your Data Sync application deployment. It is still your application’s responsibility to consume this file. We have provided an example project.
-
Create a client for your application in the Identity Management Administration Console
-
Click on the
Installationtab, selectKeycloak OIDC JSONforFormatOption, and then click onDownload. Save the downloadedkeycloak.json. -
Create a Identity Management secret:
oc create secret generic sync-keycloak-doc \
  --from-file=keycloak=./keycloak.json
The command creates a secret named
sync-keycloak-doc.The secret will contain one key,
keycloak, with the value being the text of thekeycloak.jsonfile.You can view the secret with either
oc get secret sync-keycloak-docor the OpenShift web console. -
Create a patch for your deployment configuration
This step requires patching the Data Sync application’s deployment config to create and mount a volume with the Identity Management secret we just created. Replace
$YOUR_DEPLOYMENT_CONFIG_NAMEin the following yaml section with the deployment config name of your Data Sync application and save this file assecret.yaml.spec: template: spec: containers: - env: - name: KEYCLOAK_CONFIG value: /config/keycloak.json name: $YOUR_DEPLOYMENT_CONFIG_NAME volumeMounts: - name: secret-volume mountPath: /config readOnly: true volumes: - name: secret-volume secret: items: - key: keycloak path: keycloak.json secretName: sync-keycloak-doc -
Apply the patch.
After replacing
$YOUR_DEPLOYMENT_CONFIG_NAMEwith the deployment config name, run the following command to patch the deployment configuration and trigger your application to redeploy.oc patch deploymentconfig $YOUR_DEPLOYMENT_CONFIG_NAME -p "$(cat secret.yaml)"Once your application has redeployed, it should be able to read the keycloak.json file pointed to by the KEYCLOAK_CONFIG environment variable.