Developing a Data Sync Application
- Data Sync Terminology
- Data Sync Server
- Data Sync Javascript Client
- Running Data Sync on OpenShift
- Overview
- Building and publishing the Data Sync server container
- Provisioning the Data Sync server application as a service
- Provisioning the Data Sync server applications using templates
- Connecting a Client
- Binding a Mobile App with the Data Sync server application service
- Binding Data Sync to Identity Management
- Showcase App
Data Sync is a JavaScript framework that enables a developer add real time synchronization and enhanced offline capabilities to mobile applications.
Data Sync includes two components:
-
Sync Server is a set of Node.js libraries that can be used to build a custom backend Data Sync service using GraphQL.
-
Sync Client is a client side JavaScript library for building web and mobile applications backed by Sync Server.
Features include:
-
Real Time Synchronisation
-
Conflict Resolution
-
Robust offline experience
-
Authentication and Authorization (using the Identity Management service)
-
Metrics (using the Mobile Metrics Service)
-
Audit Logging
Unlike other mobile services which provide a server and an API, Data Sync is a framework that you use to develop services. Typically, you develop a Data Sync service as follows:
-
Design a GraphQL schema.
-
Develop a server side service.
-
Containerize your server and deploy it to OpenShift as a Data Sync App.
-
Bind your mobile app to that data sync server app.
-
Configure your mobile app to point to the data sync server app.
-
Complete your mobile app development.
-
Build and run your mobile app.
Data Sync Terminology
This section describes terminology that is associated with Data Sync.
- GraphQL
-
A query language for your API, and a server-side runtime for executing queries by using a type system you define for your data. An alternative approach to REST for building APIs and applications. See GraphQL.
- Apollo
-
Apollo is an implementation of GraphQL designed for the needs of product engineering teams building modern, data-driven applications. Apollo includes two open-source libraries, Apollo Server and Apollo Client. See Apollo.
- Apollo Server
-
Apollo Server is a library for building GraphQL APIs in Node.js. A developer defines a GraphQL schema and a set of resolvers to implement each part of the schema. See Apollo Server.
- Apollo Client
-
Apollo Client is a JavaScript client library for building web and mobile applications powered by a GraphQL API. See Apollo Client.
Data Sync Server
Getting Started with Hello World Data Sync
Sync Server is a set of Node.js libraries that can be used to build a custom backend Data Sync service using GraphQL.
Sync Server is the starting point for developing a Data Sync application. Used with Express, this module leverages Apollo Server and provides extension points for additional features and integrations.
In this example, you add libraries to your node.js project, create an index.js file, run the server, and confirm that it works.
-
You have Node.js and npm installed.
-
You have created a node.js project.
-
Add libraries to your Node.js application:
$ npm install graphql (1)
$ npm install express (2)
$ npm install @aerogear/voyager-server (3)
1 See https://graphql.org/ 2 See https://expressjs.com/ 3 The Sync Server library that enables data sync -
Create an
index.jsfile with the following content:const express = require('express') //Include our server libraries const { VoyagerServer, gql } = require('@aerogear/voyager-server') //Provide your graphql schema const typeDefs = gql` type Query { hello: String } ` //Create the resolvers for your schema const resolvers = { Query: { hello: (obj, args, context, info) => { return `Hello world` } } } //Initialize the library with your Graphql information const server = VoyagerServer({ typeDefs, resolvers }) //Connect the server to express const app = express() server.applyMiddleware({ app }) app.listen(4000, () => console.log(`🚀 Server ready at http://localhost:4000/graphql`) ) -
Run the server:
$ node index.js 🚀 Server ready at http://localhost:4000/graphql -
Browse
http://localhost:4000/graphqland interact with the playground. For example:{ hello } -
Check the output. For the example above, the output should be:
{
  "data": {
    "hello": "Hello world"
  }
}
To get started with the Data Sync framework, see the sample application. In this app, you can explore a more complex schema.
Before proceeding, make sure you have an understanding of the following GraphQL concepts:
-
Schema design
-
Resolvers
-
Subscriptions
Conflict Resolution
Applications that allow users to modify data while offline most likely have to deal with conflicts. A conflict occurs whenever two or more clients try to modify the same data in between synchronizations.
Example: A user tried to modify a record while they were offline. When they came back online, they discovered that the record was already deleted.
Conflict resolution is how the application handles the conflict and ensures the correct data is stored. In most cases, the way conflicts are detected and resolved are incredibly specific to an application and the underlying data storage.
In a GraphQL server, conflict detection and resolution happens exclusively in mutations.
Resolving Conflicts
At a high level, there is a typical flow to detecting and resolving conflicts.
-
A Mutation Occurs - A client tries to modify or delete an object on the server using a GraphQL mutation.
-
Read the Object - The server reads the current object the client is trying to modify from the data source (usually a database).
-
Conflict Detection - The server compares the current object with the data sent by the client to see if there was a conflict. The developer can choose how the comparison is done.
-
Conflict Resolution - Conflict resolution can be deferred to the client or it can be done on the server. The developer can choose the resolution strategy.
-
Persist the Data - Conflict Resolution on the server results in a new object which should be persisted.
The aerogear/voyager-conflicts module uses the concept of pluggable conflict resolution to help developers with the Conflict Detection and Conflict Resolution steps.
Pluggable Conflict Resolution
Pluggable conflict resolution is a concept that allows developers to define their own logic for conflict detection and conflict resolution, regardless of the data storage.
The conflict detection and resolution is enabled by Sync Server, while the fetching and storing of data is the responsibility of the developer.
Pluggable conflict resolution supports the following implementations:
-
VersionedObjectState- depends on version field supplied in objects (used by default when importing conflictHandler) -
HashObjectState- depends on hash calculated from entire object
Implementations are based on the ObjectState interface that can be extended to provide custom implementation for conflict detection.
-
GraphQL server with resolvers.
-
Database or any other form of data storage that can cause data conflicts. AeroGear recommends that you store data in a secure location. If you use a database, it is your responsibility to administer, maintain and backup that database. If you use any other form of data storage, you are responsible for backing up the data.
Version Based Conflict Resolution
Version based conflict resolution is the recommended and simplest approach for conflict detection and resolution.
The core idea is that every object has a version property with an integer value. For example:
{
  title: "Buy some milk"
  version: 1
}
When a client tries to update object, they must send along their last known version number along with the changes to the server. The server updates the version, persists the changes and sends back the new object.
{
  title: "Buy some bread"
  version: 2
}
A conflict occurs when the version number sent by the client does not match the version stored in the server. This means a different client already updated the object.
Using Version Based Conflict Resolution
-
Import the @aerogear/voyager-conflicts package.
const { conflictHandler } = require('@aerogear/voyager-conflicts') -
Add a version field to the GraphQL type that should support conflict resolution. The version should also be stored in the data storage.
type Task { title: String version: Int } -
Add an example mutation.
type Mutation { updateTask(title: String!, version: Int!): Task } -
Implement the resolver.
Conflicts can be resolved either on the client or the server. Depending on the strategy used, the resolver implementation will differ. See the sections below for the individual implementations.
Resolving Conflicts on the Client
{
  updateTask: async (obj, clientData, context, info) => {
    // 1. Read the Object from the database. This example uses Knex https://knexjs.org/.
    const task = await context.db('tasks').select().where('id', clientData.id).then((rows) => rows[0])

    // 2. Conflict Detection using `VersionedObjectState`
    //    If the version number from the database does not match the one sent by the client
    //    A conflict occurs
    if (conflictHandler.hasConflict(task, clientData)) {
      // If a conflict is detected, choose to resolve on the client.
      const { response } = conflictHandler.resolveOnClient(task, clientData)
      return response
    }

    // 3. Always call nextState before persisting the updated record.
    // This ensures it has the correct version number
    conflictHandler.nextState(clientData)

    // 4. Persist the update to the database
    const update = await context.db('tasks')
      .update(clientData)
      .where('id', clientData.id)
      .returning('*')
      .then((rows) => rows[0])

    return update
  }
}
In the example above, conflictHandler.resolveOnClient is used when a conflict is detected. resolveOnClient returns a response object which should be returned to the client. The response contains the conflicting data and some metadata which the client can use to resolve the conflict.
Since the conflict will be resolved on the client, it is not required to persist the data. However, if there is no conflict, the data sent by the client should be persisted.
Resolving Conflicts on the Server
conflictHandler.resolveOnServer is used to resolve conflicts on the server side. resolveOnServer accepts a ConfictResolutionStrategy function as its first argument. The example below uses one of the default conflict resolution strategies from the @aerogear/voyager-conflicts module.
const { conflictHandler, strategies } = require('@aerogear/voyager-conflicts') {
updateTask: async (obj, clientData, context, info) => {
// 1. Read the Object from the database. This example uses Knex https://knexjs.org/.
const task = await context.db('tasks').select().where('id', clientData.id).then((rows) => rows[0])
// 2. Conflict Detection using `VersionedObjectState`
// If the version number from the database does not match the one sent by the client
// A conflict occurs
if (conflictHandler.hasConflict(task, clientData)) {
// If a conflict is detected, resolve it on the server using one of the default strategies.
const { resolvedState, response } = await conflictHandler.resolveOnServer(strategies.clientWins, task, clientData)
// persist the resolved data to the database and then return the conflict response
await context.db('tasks')
.update(resolvedState)
.where('id', resolvedState.id)
.returning('*')
.then((rows) => rows[0])
return response
}
// 3. Always call nextState before persisting the updated record.
// This ensures it has the correct version number
conflictHandler.nextState(clientData)
// 4. Persist the update to the database and return it to the client
const update = await context.db('tasks')
.update(clientData)
.where('id', clientData.id)
.returning('*')
.then((rows) => rows[0])
return update
}
}When there is no conflict, conflictHandler.nextState(clientData) is called and the data is persisted. When a conflict occurs, the following happens.
-
conflictHandler.resolveOnServeris called with theclientWinsstrategy. In this case, theresolvedStatewill be the new data provided by the client. The newlyresolvedStateshould be persisted. -
conflictHandler.resolveOnServeralso returns aresponse, which should be returned to the client.
The response object is a ConflictResolution object that tells the client there was a conflict, that it was resolved on the server and provides the new resolvedState. In most cases, the client needs to know about conflicts that happen on the server. This allows the client to handle the conflict accordingly. For example, the screen the user is looking at might need to be refreshed with new data after a conflict.
Conflict Resolution Strategies
There is one default conflict resolution strategy.
-
clientWins- This strategy accepts the data provided by the client.
Conflict Resolution using the reject Function
It is possible to implement a 'server wins' style strategy using the reject method. This is useful in conflict cases where we want to reject the client’s changes and force the client to use the latest data stored on the sever.
// If a conflict is detected, call the reject function
// to keep the server side data and force the client to update
if (conflictHandler.hasConflict(serverData, clientData)) {
  return conflictHandler.reject(task, clientData)
}
// otherwise continue and perform the standard mutation logic
Custom Conflict Resolution Strategies
In most real world cases, the conflict resolution strategies used by your application are custom and specific to your application’s needs. Your application may deal with different conflicts in different ways. It is possible to implement a custom ConflictResolutionStrategy function to be used with resolveOnServer.
function customResolutionStrategy (serverState, clientState) {
  return {
    title: `${serverState.title} ${clientState.title}`
  }
}
This example takes string values from the server and the client records, merges them together and returns the newly resolved object. This example is a little contrived but it shows how any strategy could be implemented.
Use the custom strategy in your resolvers the same way as the previous examples.
if (conflictHandler.hasConflict(serverData, clientData)) {
  // If a conflict is detected, resolve it on the server using the custom strategy.
  const { resolvedState, response } = conflictHandler.resolveOnServer(customResolutionStrategy, serverData, clientData)
  // persist the resolved data to the database and then return the conflict response
  await persistToDatabase(resolvedState)
  return response
}
The custom ConflictResolutionStrategy function can also be async or return a Promise if you need to do some asynchronous operations as part of your strategy (e.g. call to an external service).
Implementing Custom Conflict Mechanism
The ObjectState interface is a complete conflict resolution implementation that provides a set of rules to detect and handle conflict. Interface will allow developers to handle conflict on the client or the server. nextState method is a way for interface to modify existing object before is being saved to the database.
For example when using lastModified field as a way to detect conflicts:
public nextState(currentObjectState: ObjectStateData) {
  currentObjectState.lastModified = new Date()
  return currentObjectState
}
Accessing Data
Typically, a Data Sync application accesses a database. The GraphQL specification and Sync Server modules do not require an application to use a particular type of database, and the developer of the application can choose a database that is most suitable for the application.
| AeroGear recommends that you store data in a secure location. If you use a database, it is your responsibility to administer, maintain and backup that database. |
The GraphQL specification and Sync Server modules not require an application to use a particular type of database, and the developer of the application can choose a database that is most suitable for the application.
From a high level, this section describes the steps to access data from a database in a Data Sync application:
-
Initialize the database connection on app start.
-
Add the database connection to the
contextobject. -
Retrieve/persist data to the database in the application’s resolvers.
-
Initialize the database connection
AeroGear recommends that the database connection is set up on application start, and fail if the connection can not be established. In order to connect to the database, usually the information like the hostname and port number of the database server, the credentials to authenticate are required.
AeroGear recommends that you use environment variables to set up the database connection. If the application is going to be deployed on OpenShift as described in [Running your Data Sync application on OpenShift], then the following environment variables will be setup for the application automatically:
Field Name Environment Variable Name Database Server Hostname
DB_HOSTNAME
Database Server Port
DB_PORT
Database Server Username
DB_USERNAME
Database Server Password
DB_PASSWORD
Database name
DB_NAME
Use SSL
DB_SSL
For example, if an application needs to connect to a PostgreSQL database (where all tables and schemas are already set up) then a database connection can be established on app start as follows:
//knex is a SQL query builder const knex = require('knex') const config = { database: process.env.DB_NAME || 'users', user: process.env.DB_USERNAME || 'postgresql', password: process.env.DB_PASSWORD || 'postgres', host: process.env.DB_HOSTNAME || '127.0.0.1', port: process.env.DB_PORT || '5432' } const db = knex({ client: 'pg', connection: config }) -
Add the database connection to the
contextobject so that a resolver can access the database.From a very high level, the
contextobject is an object shared by all resolvers in a particular query, and is used to contain per-request state, including authentication information, dataloader instances, and anything else that should be taken into account when resolving the query.For more information, see the the Apollo documentation for the context argument.
The database connection can be added to the
contextobject from the previous example as follows:const typeDefs = //define the schema const resolvers = //define the resolvers const apolloConfig = { typeDefs, resolvers, context: { db: db.client } } const voyagerConfig = {...} //other config for the Voyager server const apolloServer = VoyagerServer(apolloConfig, voyagerConfig) -
Use the database connection in resolvers
Once the database connection is available in the
contextobject, it can be used in resolvers to retrieve/persist data.Using the previous example, the schema for the application is:
type Task {
  id: ID!
  version: Int
  title: String!
  description: String!
}

type Query {
  allTasks(first: Int, after: String): [Task],
}
In the resolver for the
allTasksquery, the database connection can be used to retrieve data from the database:const resolvers = { Query: { allTasks: async (obj, args, context) => { return context.db.select().from('tasks') //use `db` from the `context` object } } }Similarly, if there are mutations, the database connection can be used in the resolvers to insert or update data to the database.
Realtime Updates
A core concept of the GraphQL specification is an operation type called Subscription, they provide a mechanism for real time updates.
To enable Subscriptions on the server, create an appropriate schema similar to the following example.
-
Create a schema to support subscriptions.
For example, in the following schema a
Tasktype is defined, followed by required Mutations and Subscriptions. When a new task is created, the resolver for that task publishes the result of this mutation to theTaskCreatedchannel.const { gql } = require('@aerogear/voyager-server') const typeDefs = gql ` type Task { id: ID! title: String! description: String! } type Mutation { createTask(title: String!, description: String!): Task } type Subscription { taskCreated: Task } ` const resolvers = { Mutation: { createTask: async (obj, args, context, info) => { const result = tasks.create(args) pubSub.publish('TaskCreated', { taskCreated: result }); return result } }, Subscription: { taskCreated: { subscribe: () => pubSub.asyncIterator('TaskCreated') } }, }The pubSub mechanism used in the above example is deliberately ommited to focus on the GraphQL aspects of Subscriptions. For more information on the available PubSub implementations see: PubSub Implementations. -
Use the
subscriptions-transport-wspackage to set up the server.For more information on how to use and configure
SubscriptionServersee the Apollo Subscription Server documentation.Using the example server described in [sync-server-getting-started] you can add subscriptions as follows by introducing http and wraping our express app:
const http = require('http')
const { SubscriptionServer } = require('subscriptions-transport-ws')
const { execute, subscribe } = require('graphql')

const httpServer = http.createServer(app)

server.applyMiddleware({ app })

httpServer.listen(4000, () => {
  new SubscriptionServer ({
    execute,
    subscribe,
    schema: server.schema
  }, {
    server: httpServer,
    path: '/graphql'
  })
})
| For information on how to protect this subscription server with Identity Management see [sync-server-auth]. |
-
For more information on GraphQL subscriptions, see the Subscriptions documentation.
-
For documentation on how to use Subscriptions on your client, see Realtime Updates.
Authentication and Authorization using Keycloak
Using the Identity Management service and the @aerogear/voyager-keycloak module, it is possible to add security to a Sync Server application.
The @aerogear/voyager-keycloak module provides the following features out of the box:
-
Authentication - Ensure only authenticated users can access your server endpoints, including the main GraphQL endpoint.
-
Authorization - Use the
@hasRole()directive within the GraphQL schema to implement role based access control (RBAC) on the GraphQL level. -
Integration with GraphQL context - Use the
contextobject within the GraphQL resolvers to access user credentials and several helper functions.
-
There is a Keycloak service available.
-
You must add a valid
keycloak.jsonconfig file to your project.-
Create a client for your application in the Keycloak administration console.
-
Click on the Installation tab.
-
Select Keycloak OIDC JSON for Format option, and click Download.
-
Protecting Sync Server using Keycloak
-
Import the
@aerogear/voyager-keycloakmoduleconst { KeycloakSecurityService } = require('@aerogear/voyager-keycloak') -
Read the Keycloak config and pass it to initialise the
KeycloakSecurityService.const keycloakConfig = JSON.parse(fs.readFileSync(path.resolve(__dirname, './path/to/keycloak.json'))) const keycloakService = new KeycloakSecurityService(keycloakConfig) -
Use the
keycloakServiceinstance to protect your app:const app = express() keycloakService.applyAuthMiddleware(app) -
Configure the Voyager server so that the
keycloakServiceis used as the security service:const voyagerConfig = { securityService: keycloakService } const server = VoyagerServer(apolloConfig, voyagerConfig)
The Keycloak Example Server Guide has an example server based off the instructions above and shows all of the steps needed to get it running.
Protecting Subscriptions using Keycloak
If you have set up a subscription server as described in Realtime Updates and you have set up Identity Management as described above then your application should make use of the onConnect function to validate the token provided by the client. An example implementation of onConnect is shown below with a KeycloakService set up as shown above in Setting Up Keycloak Protection in Sync Server.
  new SubscriptionServer ({
    execute,
    subscribe,
    onConnect: async connectionParams => {
      return await keycloakService.validateToken(connectionParams)
    },
    schema: server.schema
  }, ...)
Using the hasRole directive in a schema
The Voyager Keycloak module provides the @hasRole directive to define role based authorisation in your schema. The @hasRole directive is a special annotation that can be applied to
-
Fields
-
Queries
-
Mutations
-
Subscriptions
The @hasRole usage is as follows:
-
@hasRole(role: String) -
Example -
@hasRole(role: "admin"]) -
If the authenticated user has the role
adminthey will be authorized. -
@hasRole(role: [String]) -
Example -
@hasRole(role: ["admin", "editor"]) -
If the authenticated user has at least one of the roles in the list, they will be authorized.
The default behaviour is to check client roles. For example, @hasRole(role: "admin") will check that user has a client role called admin. @hasRole(role: "realm:admin") will check if that user has a realm role called admin
The syntax for checking a realm role is @hasRole(role: "realm:<role>"). For example, @hasRole(role: "realm:admin"). Using a list of roles, it is possible to check for both client and realm roles at the same time.
The following example demonstrates how the @hasRole directive can be used to define role based authorization on various parts of a GraphQL schema. This example schema represents publishing application like a news or blog website.
type Post {
  id: ID!
  title: String!
  author: Author!
  content: String!
  createdAt: Int!
}

type Author {
  id: ID!
  name: String!
  posts: [Post]!
  address: String! @hasRole(role: "admin")
  age: Int! @hasRole(role: "admin")
}

type Query {
  allPosts:[Post]!
  getAuthor(id: ID!):Author!
}

type Mutation {
  editPost:[Post]! @hasRole(role: ["editor", "admin"])
  deletePost(id: ID!):[Post] @hasRole(role: "admin")
}
There are two types:
-
Post- This might be an article or a blog post -
Author- This would represent the person that authored a Post
There are two Queries:
-
allPosts- This might return a list of posts -
getAuthor- This would return details about an Author
There are two Mutations:
-
editPost- This would edit an existing post -
deletePost- This would delete a post.
In the example schema, the @hasRole directive has been applied to the editPost and deletePost mutations. The same could be done on Queries.
-
Only users with the roles
editorand/oradminare allowed to perform theeditPostmutation. -
Only users with the role
adminare allowed to perform thedeletePostmutation.
This example shows how the @hasRole directive can be used on various queries and mutations.
In the example schema, the Author type has the fields address and age which both have hasRole(role: "admin") applied.
This means that users without the role admin are not authorized to request these fields in any query or mutation.
For example, non admin users are allowed to run the getAuthor query, but they cannot request back the address or age fields.
Enabling file uploads
Sync Server provides support for uploading binary data along with the GraphQL queries.
The implementation relies on upstream Apollo Server capabilities.
The upload functionality uses the GraphQL multipart form requests specification. File upload needs to be implemented on both server and client:
-
On the client HTML FileList objects are mapped into a mutation and sent to the server in a multipart request.
-
On the server: The multipart request is handled. The server processes it and provides an upload argument to a resolver. In the resolver function, the upload promise resolves an object.
| File upload is based on graphql-multipart-request-spec. |
To enable file uploads, create a schema and use the Upload scalar.
For example:
const { ApolloServer, gql } = require('apollo-server');

const typeDefs = gql`
  type File {
    filename: String!
    mimetype: String!
    encoding: String!
  }
  type Query {
    uploads: [File]
  }
  type Mutation {
    singleUpload(file: Upload!): File!
  }
`;
The following schema enables file uploads. The Upload scalar will be injected as one of the arguments in the resolvers.
The Upload scalar contains all file metadata and a Readable Stream that can be used to save the file to a specific location.
    async singleUpload(parent, { file }) {
      const { stream, filename, mimetype, encoding } = await file;
      // Save file and return required metadata
    }
See Official Apollo blog post for more information.
Metrics and Logging
Metrics
Sync Server can expose a variety of useful metrics that can be consumed and visualised by the Mobile Metrics service. (Prometheus for data collection and Grafana for Visualisation).
The @aerogear/voyager-metrics module can be used to mount a metrics middleware, exposing a metrics endpoint that can be consumed by prometheus (default: /metrics).
Enabling Metrics in Sync Server
-
Import the
@aerogear/voyager-metricsmodule.const metrics = require('@aerogear/voyager-metrics') -
Apply the metrics middleware to your Express app. This will expose metrics at the given endpoint.
const app = express() metrics.applyMetricsMiddlewares(app, { path: '/metrics' }) -
Inject the metrics module into Sync Server. This will ensure metrics at the GraphQL level can be exposed.
const voyagerConfig = {
  metrics
}
const server = VoyagerServer(apolloConfig, voyagerConfig)
The Metrics Example Server Guide has an example server based off the instructions above and shows all of the steps needed to get it running.
Monitoring a Sync Server Application
-
You have provisioned the Mobile Metrics service.
-
You have provisioned your Data Sync service.
-
You have enabled metrics in Sync Server.
| The Mobile Metrics Service and your Sync Server application must be provisioned in the same OpenShift project to access data. |
Overview
As there can be multiple Sync Server applications in a namespace, Sync Server application provisioning procedure creates a new Grafana dashboard for the Sync Server application that is being provisioned.
After the Mobile Metrics Service (includes Grafana for visualization and the Prometheus monitoring system) and your Sync Server application are provisioned, you should be able to see the "Data Sync Metrics - <your app name>" in the list of available dashboards (navigate to Grafana’s exposed URL → Log in → Home → Select Data Sync Metrics - <your app name>).
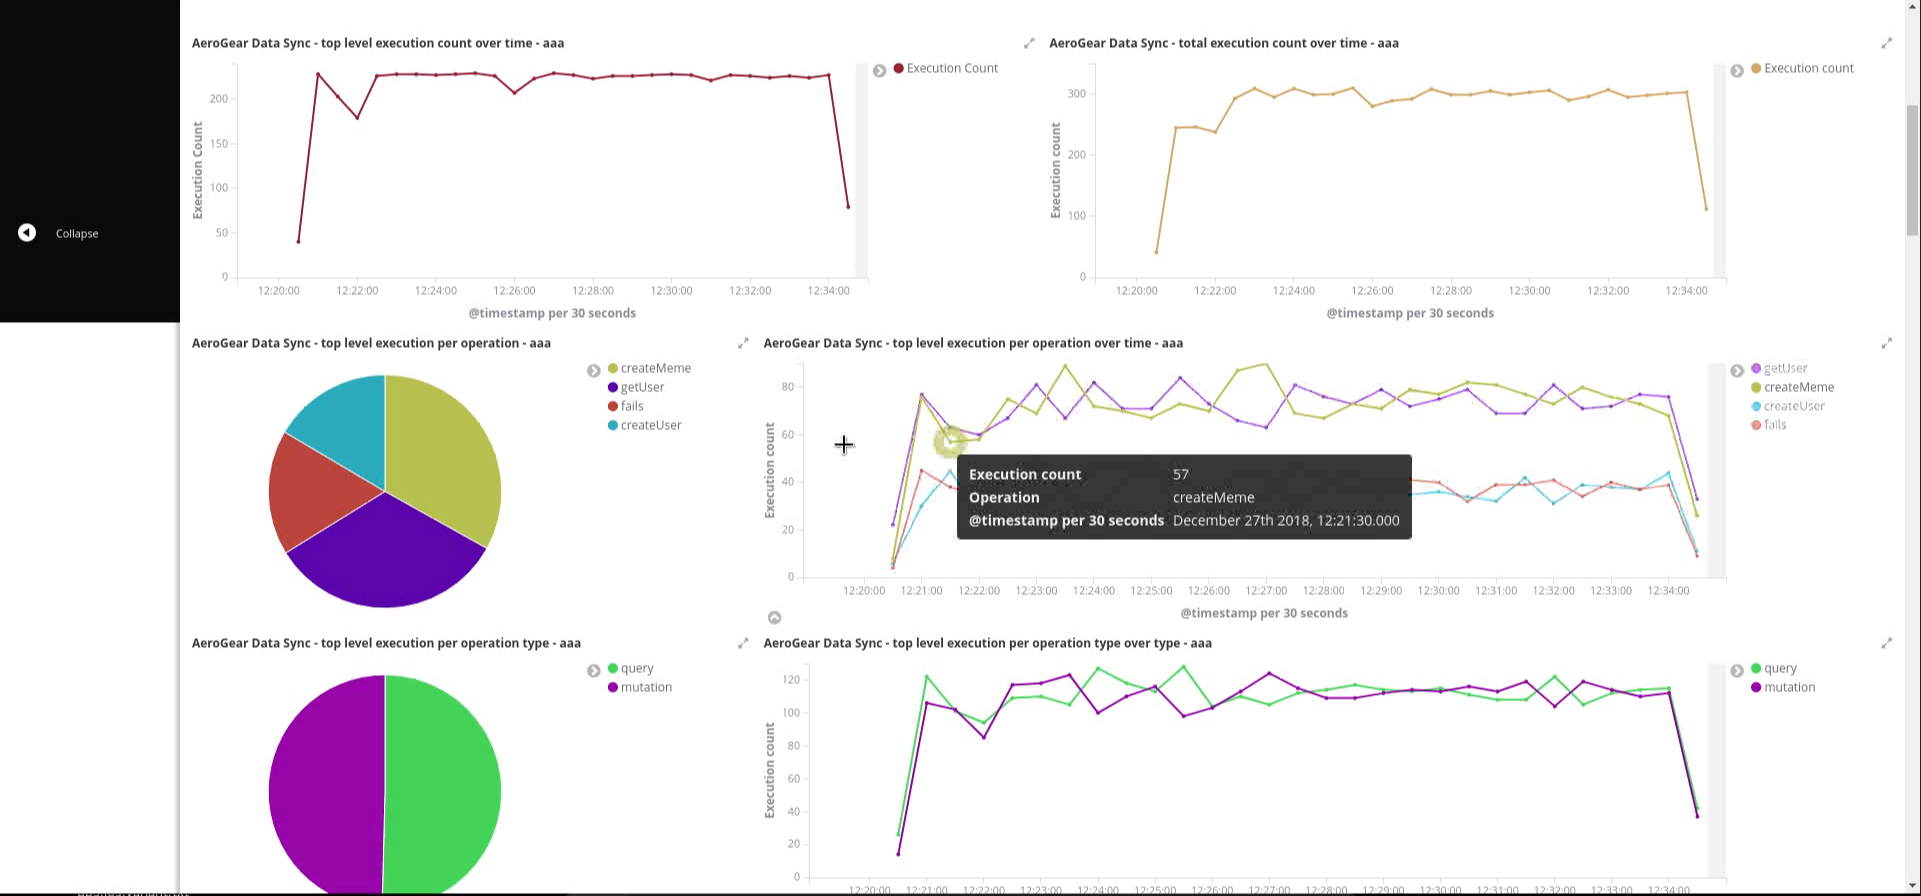
Dashboard panel descriptions
The Data Sync dashboard consists of several panels which give you an overview of the specific events and resources, such as memory usage, CPU usage, resolved operation count etc.
The dashboard is separated into 2 section. "Client" section shows some basic metrics about the clients and users and the "Server" secion shows some metrics about the server status.
Below you will find a detailed description of each panel and its values.
Singlestat panels show you the main summary of a single data series.
-
CPU Usage: CPU usage percentage of the Sync Server application used currently.
-
Memory Usage: The amount of memory currently used by the Sync Server application.
Used to show how certain values change over time, e.g. the number of operations resolved.
-
Unique Clients Over Time: Overview of the number of unique clients over the selected time range. Note that a "client" is a an application installation on a device. The client id is reset when the application is reinstalled on the same device.
-
Unique Users Over Time: Overview of the number of unique users over the selected time range. Note that a "user" is a user who is authenticated with the Identity Management.
-
Memory Usage in Time: The amount of memory used by the Sync Server application over time.
-
CPU Usage in Time: The percentage of CPU used by the Sync Server application over time.
-
Queries/Mutations Resolved: Overview of the resolved queries and mutations over time.
-
Resolver Timings: Overview of the how long it took to resolve operations over time.
-
Server Response Time: Overview of the how long it took the server to respond the requests.
-
Operations vs Conflicts: Overview of the resolver executions and the conflicts happened.
-
Conflicts Over Time per Operation: Overview of the conflicts and what operation caused them.
Audit Logs
Audit logging is a mechanism to track all of the actions that occur inside your application. Audit Logging in Sync Server provides two main benefits.
-
It is possible to build a detailed audit trail of every action that has occured in the application. This can also include information about the user that performed the action, and the mobile device they were using.
-
The data from the audit logs can be aggregated and visualised to provide more insight into how your application is used.
Audit Logging Architecture
Audit logging can be enabled in Sync Server using the @aerogear/voyager-audit module. When enabled, all actions such as GraphQL mutations, queries and subscriptions are logged in great detail to stdout in JSON format.
An audit log example message is shown below.
{
  "level": 30,
  "time": 1545385687476,
  "pid": 11889,
  "hostname": "localhost.localdomain",
  "tag": "AUDIT",
  "logType" "RESOLVER_COMPLETION",
  "msg": "",
  "operationType": "query",
  "fieldName": "hello",
  "parentTypeName": "Query",
  "path": "hello",
  "success": true,
  "arguments": {},
  "clientInfo": {
    "clientId": "848d2a10-0505-11e9-888f-8d166149101a",
    "timestamp": 1545385686843,
    "data": {
      "app": {
        "appId": "org.aerogear.sync.example",
        "appVersion": "0.0.1",
        "sdkVersion": "0.0.1",
        "framework": "cordova"
      },
      "device": {
        "platform": "android",
        "platformVersion": "9",
        "device": "General Mobile GM8 Pro"
      }
    }
  },
  "userInfo": {
    "jti": "6ae0966a-9d61-430b-8167-d2b3c0b42709",
    "exp": 1545761725,
    "nbf": 0,
    "iat": 1545725725,
    "iss": "http://localhost:8080/auth/realms/voyager-testing",
    "aud": "voyager-testing",
    "sub": "ea2312e9-1aae-4b67-8674-a3aacf20a71d",
    "typ": "Bearer",
    "azp": "voyager-testing",
    "auth_time": 1545725725,
    "session_state": "1ba4d429-8010-4f38-8002-9cc72550850d",
    "acr": "1",
    "allowed-origins": [
      "*"
    ],
    "realm_access": {
      "roles": [
        "admin",
        "uma_authorization"
      ]
    },
    "resource_access": {
      "voyager-testing": {
        "roles": [
          "admin"
        ]
      },
      "account": {
        "roles": [
          "manage-account",
          "manage-account-links",
          "view-profile"
        ]
      }
    },
    "name": "Ali Ok",
    "preferred_username": "developer",
    "given_name": "Ali",
    "family_name": "Ok",
    "email": "aliok@example.com"
  },
  "v": 1
}
The clientInfo property of the audit log message is available only if the client is sending the client information to Sync Server. That has to be enabled separately in the client. Additionally, data in that property can only be collected if the app is a Cordova app or a native app. Simple web clients cannot get the device, client nor app details and cannot send this information.
The userInfo property is available only if Sync Server is protected by an identity manager, such as Keycloak, and if the user is authenticated. See see [sync-server-auth].
Enabling Audit Logging in Voyager Server
Audit logging is enabled in Sync Server using the @aerogear/voyager-audit
-
Import the
@aerogear/voyager-auditmoduleconst auditLogger = require('@aerogear/voyager-audit') -
Inject the auditLogger module into the Sync Server. This enables audit logging within your application.
const voyagerConfig = {
  auditLogger
}
const server = VoyagerServer(apolloConfig, voyagerConfig)
The Audit Logging Example Server Guide has an example server based off the instructions above and shows all of the steps needed to get it running.
Alternatively, if the default audit logger does not match your requirements, you can create an audit logger that implements the AuditLogger interface as defined below.
AuditLogger interfaceexport interface AuditLogger {
logResolverCompletion(msg: string, success: boolean, obj: any, args: any, context: any, info: GraphQLResolveInfo): void
logConflict (msg: string, serverData: any, clientData: any, obj: any, args: any, context: any, info: GraphQLResolveInfo): void
auditLog(msg: string, obj: any, args: any, context: any, info: GraphQLResolveInfo): void
}The following example implements an AuditLogger and injects it into the Sync Server.
The example redacts the arguments using a myCustomRedactionFunction function.
const { buildPath } = require('@aerogear/voyager-tools')
// ...

const auditLogger = {
  auditLog: function(msg, obj, args, context, info){
    console.log(JSON.stringify(
      {
        audit: {
          tag: 'AUDIT',
          logType: logType,
          msg: msg || '',
          requestId: context && context.request ? context.request.id : '',
          operationType: info.operation.operation,
          fieldName: info.fieldName,
          parentTypeName: info.parentType.name,
          path: buildPath(info.path),
          parent: obj,
          arguments: myCustomRedactionFunction(args),
          clientInfo: context && context.request && context.request.body && context.request.body.extensions && context.request.body.extensions.metrics || undefined,
          authenticated: !!(context && context.auth && context.auth.isAuthenticated()),
          userInfo: (context && context.auth && context.auth.accessToken) ? context.auth.accessToken.content : undefined
        }
      }
    ));
  },

  logResolverCompletion: function(msg, success, obj, args, context, info){
    console.log(JSON.stringify(
      {
        audit: {
          tag: 'AUDIT',
          logType: 'RESOLVER_COMPLETION',
          msg: msg || '',
          requestId: context && context.request ? context.request.id : '',
          operationType: info.operation.operation,
          fieldName: info.fieldName,
          parentTypeName: info.parentType.name,
          path: buildPath(info.path),
          success,
          parent: obj,
          arguments: myCustomRedactionFunction(args),
          clientInfo: context && context.request && context.request.body && context.request.body.extensions && context.request.body.extensions.metrics || undefined,
          authenticated: !!(context && context.auth && context.auth.isAuthenticated()),
          userInfo: (context && context.auth && context.auth.accessToken) ? context.auth.accessToken.content : undefined
        }
      }
    ));
  },

  logConflict: function (msg, serverData, clientData, obj, args, context, info) {
    console.log(JSON.stringify(
      {
        audit: {
          tag: 'AUDIT',
          logType: LOG_TYPE_CONFLICT,
          msg: msg || '',
          requestId: context && context.request ? context.request.id : '',
          operationType: info.operation.operation,
          fieldName: info.fieldName,
          parentTypeName: info.parentType.name,
          path: buildPath(info.path),
          parent: obj,
          arguments: myCustomRedactionFunction(args),
          clientInfo: context && context.request && context.request.body && context.request.body.extensions && context.request.body.extensions.metrics || undefined,
          authenticated: !!(context && context.auth && context.auth.isAuthenticated()),
          userInfo: (context && context.auth && context.auth.accessToken) ? context.auth.accessToken.content : undefined,
          conflict: true,
          conflictData: {
            message: msg,
            myCustomRedactionFunction(serverData),
            myCustomRedactionFunction(clientData),
          }
        }
      }
    ));
  }
}

// ...

const voyagerConfig = {
  auditLogger
}
const server = VoyagerServer(apolloConfig, voyagerConfig)
Sending Device Information in Sync Client
See the Sync Client Audit Logs section for more information.
Exploring Audit Logs
Sync Server simply prints audit logs to stdout and it is the responsibility of another component to pick up these logs and provide
functionality to the user to make use of the logs.
The EFK stack (ElasticSearch, Fluentd and Kibana) on OpenShift is the recommended solution in this guide. We provide Kibana dashboards with a number of useful visualisations and insights into Sync Server.
All application logs printed to stdout are sent to ElasticSearch by Fluentd. However, the audit log messages printed by @aerogear/voyager-audit are printed in a format that is used by the Kibana dashboards.
Configuring OpenShift Logging
OpenShift logging can be enabled as described in OpenShift documentation.
Once enabled, OpenShift logging will create a Fluentd instance per cluster node that reads the stdout and stderr of the pods in that node
and pushes the readings to the centralized ElasticSearch instance. Documents created in ElasticSearch instance can be then explored and
visualized by the Kibana instance, which is also installed by OpenShift logging.
OpenShift logging creates an index per namespace and that index is only available to users who have access to that namespace. It also creates the index patterns in Kibana in the same way.
By default, OpenShift also provides a curator which deletes the old log messages from ElasticSearch to reduce storage needs and improve performance. This has an impact on audit trails and also metrics.
For long term audit trails, curator can be configured to delete messages older than your choice. If this is not sufficient, Fluentd can be configured to write log messages to a separate storage, such as S3.
In terms of metrics, curator’s deletion age config should not be set shorter than the desired time range that you would like to see the metrics for.
Importing Kibana Saved Objects
Kibana is a visualization tool that has a great integration with ElasticSearch.
A template for Kibana saved objects is available. When the saved objects are imported, a number of saved searches, visualizations and a dashboard are created in Kibana. These then can be used to have an overview of the Voyager application.
See the screenshot of the provided dashboard below.
OpenShift logging creates ElasticSearch indices per namespace and the index names have the format project.<project-name>.<project-uid>.
For example project.myproject.49f9a0b6-09b5-11e9-9597-069f7827c758.
It also creates a Kibana index pattern for that index using the pattern project.<project-name>.<project-uid>.*.
In order to make sure the Kibana saved objects use the correct index pattern, project UID should be fetched and fed to the Kibana import template.
PROJECT_NAME=<your_project_name>
# login with your user that has access to your project
oc login
# get project UUID, which is used to build the index name
PROJECT_UUID=`oc get project $PROJECT_NAME -o go-template='{{.metadata.uid}}'`

# replace the placeholders in the template
sed \
    -e "s/<PROJECT_NAME>/${PROJECT_NAME}/g" \
    -e "s/<PROJECT_UUID>/${PROJECT_UUID}/g" \
 kibanaImportTemplate.json > kibanaImport.json
A template, kibanaImportTemplate.json is available from the Voyager GitHub repo.
Once the kibanaImport.json file is generated, import it into Kibana:
-
Open Kibana using
https://kibana.<domain>.com. Replace<domain>with the name of the cluster’s main domain. -
Click Management in the left
-
Click Saved Objects
-
Click Import and select
kibanaImport.json
Imported saved objects include the project name or the UID in their names, so that saved objects in differnt namespaces do not affect each other.
|
No index pattern is created in Kibana if there are no logs generated by an application. Also, if the fields referenced in the prepared Kibana saved objects do not exist, errors such as the following can be seen: Error: Importing AeroGear Data Sync - top level execution per platform - aaa (top_level_execution_per_platform_49f9a0b6-09b5-11e9-9597-069f7827c758) failed: Could not locate that index-pattern-field (id: audit.clientInfo.data.device.platform.raw) Error: Could not locate that index-pattern-field (id: audit.clientInfo.data.device.platform.raw) Because of these conditions, Kibana saved objects have to be imported after there are some audit logs already in ElasticSearch. At the moment, no mechanisms are provided to overcome this problem. |
Viewing the Dashboard and Audit Logs
When the Kibana saved objects are imported, a dashboard is available with several visualizations that can be used as an overview of the Voyager application status.
At the bottom of the dashboard, audit log messages can be explored directly.
For more information on how to use Kibana, see the Kibana documentation.
Data Sync Javascript Client
Introduction
The Sync Client uses the Apollo GraphQL Javascript client, adding the following features:
-
Offline query and mutation support
-
Conflict detection and resolution
-
Authentication and authorization support
-
Audit logging
Because the Sync Client is an extension to Apollo, it works with all the frameworks that Apollo supports.
For React: https://www.apollographql.com/docs/react/
For Angular: https://www.apollographql.com/docs/angular/
Cache
In order to support offline use cases, the client SDK strongly leverages Apollo Cache layer. See the Apollo cache documentation for more information.
Querying Data
To work with cache effectively, AeroGear recommends using the cache-first fetchPolicy when performing queries.
  return this.apollo.watchQuery({
    query: YOUR_QUERY,
    fetchPolicy: 'cache-first',
  });
The cache is populated by subscriptions, pooling or regular queries happening in UI. See the client-offline-support, Offline Support section for more details.
Required Field in GraphQL Types
A field called id is required in all the types when design the GraphQL schema for an application.
The client SDK expects this field to be returned from the server for a query.
Without this field some offline functionalities does not work properly.
-
You have Node.js and npm installed.
-
You have created an empty web project that supports ES6, for example, using the webpack getting started guide.
-
You have completed the server getting started guide and the application is running.
This section describes how to use the Sync Client to create mobile and web applications that can communicate with the Voyager server application.
Data Sync provides JavaScript libraries which integrate your javascript app using with a server that also uses Data Sync. The client libraries are based on the Apollo client.
Hello World Sync
Connecting our client to the server "Hello World" example. You will add the libraries to your mobile project, configure the client classes, connect to the server, and confirm that it works.
npm install @aerogear/voyager-clientBelow is a simple code example to connect to and query our Sync Server. To configure the client, a configuration object should be used. At a minimum, the httpUrl field is required and it is the url of the Voyager server application. If the client app uses subscription as well, then the wsUrl field is required too.
Core to connect to and query our server application would look like the following:
// gql is a utility function that handles gql queries
import gql from 'graphql-tag';

// createClient configures the Data Sync client based on options you provide
import {createClient} from '@aerogear/voyager-client';

// For our client application, we will connect to the local service.
let config = {
  httpUrl: "http://localhost:4000/graphql",
  wsUrl: "ws://localhost:4000/graphql",
}

async function helloWorld() {

  // Actually create the client
  let client = await createClient(config);

  // Execute the hello query
  client.query({
      fetchPolicy: 'network-only',
      query: gql`{hello}`
    })
    //Print the response of the query
    .then( ({data}) => {
      console.log(data.hello)
    });
}

helloWorld();
You can build and run this code in your project. You should see "Hello world" in your JavaScript console. The server and client can now communicate.
Supporting offline operations
The Sync Client provides first class support for performing GraphQL operations while offline. This is because the SDK uses the "cache-first" strategy when perform queries, regardless of the network status of the client. As illustrated in the diagram below, all the queries will be performed against the cache, and the Apollo client will manage filling the cache with data from the server. On top of that, the Sync Client uses a mutation store to support offline mutations.
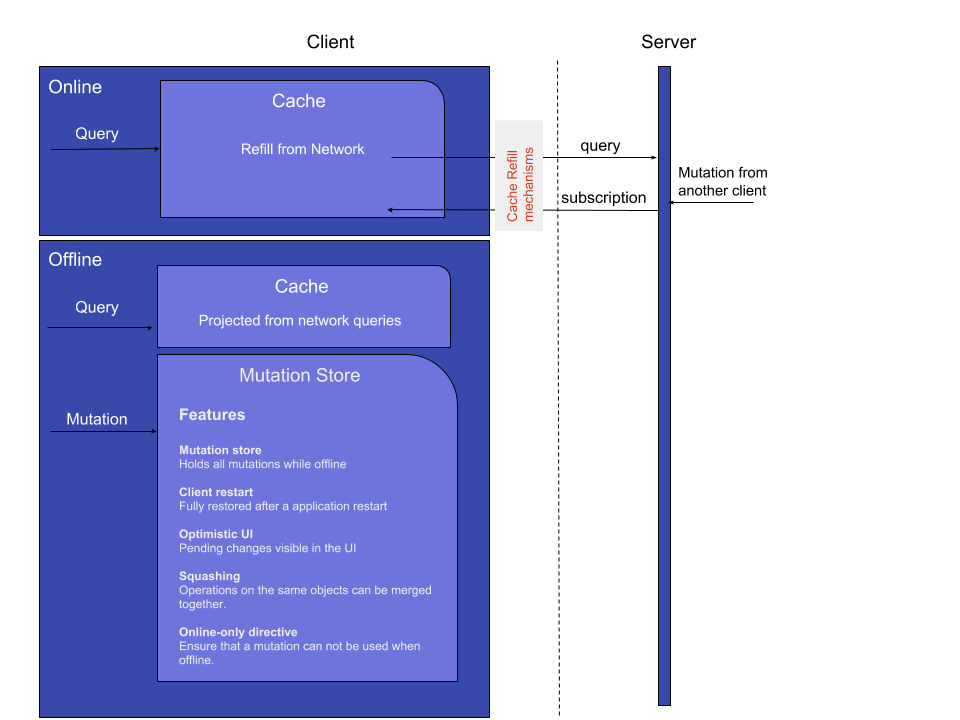
The mutation store is effectively a persisted queue, and it is used to hold query and mutation requests when the client is offline. If a client goes offline for a long period of time, it will be able to negotiate local updates with the server using conflict resolution strategies.
When a client becomes online from the offline state, the mutations that are persisted locally will be replicated back to the server, as shown in the diagram below:
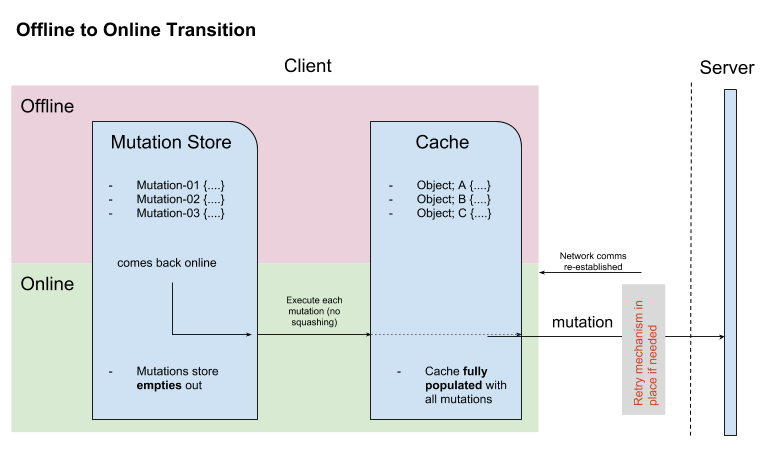
Developers can attach listeners to get notification about if a update is applied on the server or not, and take appropriate actions.
Mutations and Local Cache
By default queries are cached based on the type and id field, and the results of performed queries are cached as well and they will be available when the client is offline.
Because of this, when mutations that can change query results are performed, the refetchQueries or update options of the mutate method should be used to ensure the local cache is kept up to date.
In the following example, the app will perform an ADD_TASK mutation which will create a new task. The app also has a GET_TASKS query to list all the tasks. In order to make sure the cache for the GET_TASKS query is kept up to date whenever a new task is created, the update option is used to add the newly created task to the cache:
  client.mutate({
    mutation: ADD_TASK, variables: item,
    update: updateCacheOnAdd
  });

  function updateCacheOnAdd(cache, { data: { createTask } }) {
    let { allTasks } = cache.readQuery({ query: GET_TASKS });
    if (allTasks) {
      if (!allTasks.find((task) => task.id === createTask.id)) {
        allTasks.push(createTask);
      }
    } else {
      allTasks = [createTask];
    }
    cache.writeQuery({
      query: GET_TASKS,
      data: {
        'allTasks': allTasks
      }
    });
  }
For more information, see Apollo’s document about mutations.
Offline Workflow
If a mutation occurs while the device is offline, the client.mutate function:
-
returns immediately
-
returns a promise with an error
You can check the error object to isolate errors relating to offline state.
Invoking the watchOfflineChange() method on an error object watches for when an offline change is synced with the server, and sends an notification when triggered.
after the device is online again.
For example:
  client.mutate(...).catch((error)=> {
    // 1. Detect if this was an offline error
   if(error.networkError && error.networkError.offline){
     const offlineError: OfflineError =  error.networkError;
     // 2. We can still track when offline change is going to be replicated.
     offlineError.watchOfflineChange().then(...)
   }
});| In addition to watching individual mutations, you can add a global offline listener when creating a client. |
Global Update Functions
Apollo client holds all mutation parameters in memory. An offline Apollo client will continue to store mutation parameters and once online, it will restore all mutations to memory. Any Update Functions that are supplied to mutations cannot be cached by an Apollo client resulting in the loss of all optimisticResponses after a restart. Update functions supplied to mutations cannot be saved in the cache. As a result, all optimisticResponses will disappear from the application after a restart and it will only reappear when the Apollo client becomes online and successfully syncs with the server.
To prevent the loss of all optimisticResponses after a restart, you can configure the Update Functions to restore all optimisticResponses.
const updateFunctions = {
  // Can contain update functions from each component
  ...ItemUpdates,
  ...TasksUpdates
}

let config = {
  mutationCacheUpdates: updateFunctions,
}Listening for Events
To handle all notifications about offline related events, use the offlineQueueListener listener in the config object
The following events are emitted:
-
onOperationEnqueued- Called when new operation is being added to offline queue -
onOperationSuccess- Called when back online and operation succeeds -
onOperationFailure- Called when back online and operation fails with GraphQL error -
queueCleared- Called when offline operation queue is cleared
You can use this listener to build User Interfaces that show pending changes.
Conflicts
A conflict occurs whenever two or more clients try to modify the same data in between synchronizations.
Conflict resolution is how the application detects and resolves the conflict and ensures the correct data is stored. In most cases, the way conflicts are detected and resolved are incredibly specific to an application and the underlying data storage.
The Data Sync SDK provides some utilities to help applications detect and resolve conflicts on either server or client side. To handle conflicts on client side, developers need to configure their resolvers on the server side to return conflicts back to clients first. For more information, see the Voyager server document.
If conflicts need to be handled on client side, developers can either use the default conflict resolution implementations, or implement their own ones thanks to the pluggable conflict resolution mechanism.
Pluggable Conflict Resolution
Pluggable conflict resolution is a concept that allows developers to implement their own conflict detection and resolution logic regardless of the data storage.
It has two parts: one for detecting conflicts, and the other for resolving conflicts.
To detect conflicts, developers can use either the default version-based conflict detection mechanism, or provide their own implementation via the conflictStateProvider option in the config object that is used to initialize the sync client.
To resolve conflicts, developers can either use the default conflict resolution strategy, or provide their own ones via the conflictStrategy option in the config object.
Version Based Conflict Detection
For more details about how it works, see the server-version-based-conflict-resolution, Voyager server document.
On the client side, if this default implementation is used, developers need to make sure the version value is always passed to the server when a mutation is invoked.
Conflict Resolution Strategies
To resolve conflicts on the client side, a conflictStrategy needs to be provided. If none is provided, by default, the clientVersionWins strategy is used. This means the SDK will automatically override the server data with the current client data.
To implement a custom conflict resolution strategy provide at least one of the parameters below.
-
strategies - a dictionary object where each key is the name of a mutation and the value is the custom action for a conflict caused by that mutation
-
default - the default behavior to use if one of your mutations is not listed in
strategies
If strategies are provided but no default then clientVersionWins becomes the default.
If a mutation causes a conflict and you have not specified a conflict resolution strategy for that mutation, the system uses the clientVersionWins strategy.
|
For example:
//define a custom conflict resolver
let updateTaskConflictResolver = (serverData, clientData) => {
    ...
    return Object.assign(serverData, clientData);
};

let deleteTaskConflictResolver = (serverData, clientData) => {
    ...
    return serverData;
}

//define a default where the clientData is used
let defaultConflictResolver = (serverData, clientData) => {
    return clientData
}

//pass it to the config object
let config = {
...
  conflictStrategy: {
    strategies: {
      "TaskUpdated": updateTaskConflictResolver,
      "TaskDeleted": deleteTaskConflictResolver
    },
    default: defaultConflictResolver
  }
...
}| Client strategy is ignored when conflicts are resolved on the server. |
Listening to Conflicts
Developers can supply their own conflictListener implementation to get notifications about conflicts:
let config = {
...
  conflictListener: {
    conflictOccurred: function(operationName, resolvedData, server, client) {
      console.log(`data: ${JSON.stringify(resolvedData)}, server: ${JSON.stringify(server)} client: ${JSON.stringify(client)} `);
    }
  }
...
}
Implementing realtime updates
A core concept of the GraphQL specification is an operation type called Subscription, they provide a mechanism for real time updates.
For more information on GraphQL subscriptions see the Subscriptions documentation.
To do this GraphQL Subscriptions utilise websockets to enable clients to subscribe to published changes.
The architecture of websockets is as follows:
-
Client connects to websocket server.
-
Upon certain events, the server can publish the results of these events to the websocket.
-
Any currently connected client to that websocket receives these results.
-
The client can close the connection at any time and no longer receives updates.
Websockets are a perfect solution for delivering messages to currently active clients. To receive updates the client must be currently connected to the websocket server, updates made over this websocket while the client is offline are not consumed by the client. For this use case Push Notifications are recommended.
Sync Client comes with subscription support out of the box including auto-reconnection upon device restart or network reconnect. To enable subscriptions on your client set the following paramater in the Sync Client config object. A DataSyncConfig interface is also available from Sync Client if you wish to use it.
Setting up a client to use subscriptions
To set up a client to use subscriptions:
-
Provide a
wsUrlstring in the config object as follows:const config = { wsUrl: "ws://<your_websocket_url>" }where
<your_websocket_url>is the full URL of the websocket endpoint of your GraphQL server. -
Use the object from step 1 to initialise Sync Client:
const { createClient } = require("@aerogear/voyager-client");

const client = createClient(config)
Using Subscriptions
A standard flow to utilise subscriptions is as follows:
-
Make a network query to get data from the server
-
Watch the cache for changes to queries
-
Subscribe to changes pushed from the server
-
Unsubscibe when leaving the view where there is an active subscription
In the three examples below, subscribeToMore ensures that any further updates received from the server force the updateQuery function to be called with subscriptionData from the server.
Using subscribeToMore ensures the cache is easily updated as all GraphQL queries are automatically notified.
For more information, see the subscribeToMore documentation.
getTasks() {
  const tasks = client.watchQuery({
    query: GET_TASKS
  });

  tasks.subscribeToMore({
    document: TASK_ADDED_SUBSCRIPTION,
    updateQuery: (prev, { subscriptionData }) => {
      if(subscriptionData.data){
        const newTask = subscriptionData.data.taskAdded;
        if (prev.allTasks.find(task => task.id === newTask.id)) {
          return prev;
        } else {
          return Object.assign({}, prev, {
            allTasks: [...prev.allTasks, newTask]
          });
        }
      }
    }
  });
  return tasks;
}| In the above example some deduplication is performed to ensure the same task is not returned to the UI when it is already present. |
You can then use this query in our application to subscribe to changes so that the front end is always updated when new data is returned from the server.
this.tasks = [];
this.getTasks().subscribe(result => {
  this.tasks = result.data && result.data.allTasks;
})
Note that it is also a good idea to unsubscribe from a query upon leaving a page. This prevents possible memory leaks. This can be done by calling unsubscribe() as shown in the following example. This code should be placed in the appropriate place.
this.getTasks().unsubscribe();Handling network state changes
When using subscriptions to provide your client with realtime updates it is important to monitor network state because the client will be out of sync if the server if updated when the the client is offline.
To avoid this, Sync Client provides a NetworkStatus interface which can be used along with the NetworkInfo interface to implement custom checks of network status.
For more information about how to import and configure a custom network status checker, see Advanced Topics.
Use the following example to re-run a query after a client returns to an online state:
const { CordovaNetworkStatus, NetworkInfo } = require("@aerogear/voyager-client");
const networkStatus = new CordovaNetworkStatus();

networkStatus.onStatusChangeListener({
  onStatusChange(networkInfo: NetworkInfo) {
    const online = networkInfo.online;
    if (online) {
      client.watchQuery({
        query: GET_TASKS
      });
    }
  }
});
Authentication and Authorization
With Sync Client, user information can be passed to a Data Sync server application in two ways: headers or tokens.
Headers are used to authentication HTTP requests to the server, which are used for queries and mutations.
Tokens are used to authenticate WebSocket connections, which are used for subscriptions.
Both of them can be set via the authContextProvider configuration option. Here is an example
//get the token value from somewhere, for example the authentication service
const token = "REPLACE_WITH_REAL_TOKEN";

const config = {
  ...
  authContextProvider: function() {
    return {
      header: {
        "Authorization": `Bearer ${token}`
      },
      token: token
    }
  },
  ...
};

//create a new client
For information about how to perform authentication and authorization on the server, see the Server Authentication and Authorization Guide.
File Upload Client
Sync Client provides support for uploading binary data along with the GraphQL queries.
The binary upload implementation uses the apollo-upload-client package built by the Apollo community.
Introduction
The upload functionality uses the GraphQL multipart form requests specification. The File upload needs to be implemented on both server and client:
-
On the client HTML FileList objects are mapped into a mutation and sent to the server in a multipart request.
-
On the server: The multipart request is handled. The server processes it and provides an upload argument to a resolver. In the resolver function, the upload promise resolves an object.
| File upload is based on graphql-multipart-request-spec. |
Uploading Files from GraphQL
File upload capability adds a new GraphQL scalar Upload that can be used for mutations that operate on binary data.
The Upload scalar maps html FileList HTML5 object in GraphQL schemas.
The first step required to work with binary uploads is to write mutation that will contain Upload scalar.
The following example demonstrates how to upload a profile picture:
import gql from 'graphql-tag'
import { Mutation } from 'react-apollo'

export const UPLOAD_PROFILE = gql`
mutation changeProfilePicture($file: Upload!) {
  changeProfilePicture(file: $file) {
    filename
    mimetype
    encoding
  }
}
`;
Executing mutations
The Upload scalar will be mapped to object returned from HTML file input.
The following example shows file upload in a React application.
const uploadOneFile = () => {
  return (
    <Mutation mutation={UPLOAD_PROFILE}>
      {uploadFile => (
        <input
        type="file"
        required
        onChange={({ target: { validity, files: [file] } }) =>
          validity.valid && uploadFile({ variables: { file } });
        }
       />
      )}
    </Mutation>
  );
};
Audit Logs
As described in the Server Audit Logs section, device information can be logged as part of an audit log message. To enable it:
-
The Cordova plugin
cordova-plugin-aerogear-metricshas to be installed so that the device, client and app information can be collected.cordova plugin add cordova-plugin-aerogear-metrics -
Set
auditLoggingto true when creating a client instance.import { createClient } from '@aerogear/voyager-client'; const config = { ... auditLogging: true, ... } return await createClient(config);
Advanced Topics
Network Status
The NetworkStatus interface can be used to check the current network status, or register a listener to perform certain actions when the status of the network changes.
Two default implementations are provided to support web browsers and Cordova. The following example demonstrates how to register a listener using CordovaNetworkStatus:
import { CordovaNetworkStatus, NetworkInfo } from '@aerogear/voyager-client';
const networkStatus = new CordovaNetworkStatus();

networkStatus.onStatusChangeListener({
  onStatusChange: info => {
    const online = info.online;
    if (online) {
      //client is online, perform some actions
    } else {
      //client is offline
    }
  }
});

let config = {
  ...
  networkStatus: networkStatus,
  ...
};

//create a new client using the config
Logging Debug Messages
The Sync Client uses the debug module to log debug messages.
To enable debug logs, run the following code in a browser’s console:
localStorage.debug = 'AeroGearSync:*'Certain features can be enabled separately:
localStorage.debug = 'AeroGearSync:OfflineMutations*'Optimistic UI
By default mutations are not applied to the UI until responses are received from the server. To provide better user experience, an application may want to update the UI immediately. Optimistic response is an easy way to achieve this goal, and Sync Client provides a helper method to work with optimistic responses:
 import { createOptimisticResponse } from "@aerogear/voyager-client";

 client.mutate({
   mutation: ADD_TASK,
   variables: item,
   optimisticResponse: createOptimisticResponse("createTask", "Task", item);
 });
To detect if the provided data is an optimistic response, the optimisticResponse flag can be used.
The OptimisticResponse feature and the offlineQueueListener can be used together to deliver great offline experience for an application.
See the Showcase Apps section for more information.
Running Data Sync on OpenShift
-
You have Docker installed on your local machine.
-
You have access to an OpenShift cluster with the Service Catalog.
-
You have completed the server getting started guide.
Overview
To connect your Data Sync server and client to other services, you need to run your application in OpenShift. Data Sync provides a service catalog item to help with this.
Data Sync requires your server application to be packaged as a Docker formatted container and published to a public respository such as Docker hub.
Building and publishing the Data Sync server container
To build a server into a container, create a Dockerfile in the project’s directory. This container will need to include your server source code, its dependencies, and be configured to execute your server.
As an example:
FROM node:8
WORKDIR /usr/src/app
# copy Node.js specific files
COPY package*.json ./
# copy application source file to the workdir
COPY index.js .
RUN npm install
# TCP port that application is listening on
EXPOSE 4000
CMD [ "node", "index.js" ]
Build the Docker container and tag it:
$ docker build . --tag <your-repo>/<container-name>Push your container to Dockerhub’s repository:
$ docker push <your-repo>/<container-name>Provisioning the Data Sync server application as a service
To provision the Data Sync mobile service:
-
Log into the OpenShift console.
-
Choose a project where you have previously provisioned Mobile Developer Console.
-
Select Catalog from the left hand menu.
You can filter the catalog items to only show mobile specific items by selecting the Mobile tab.
-
Choose the Data Sync service.
-
Follow the wizard for provisioning that service.
If prompted to Create a Binding, choose Do not bind at this time.
Fill in all of the required parameters for the service:
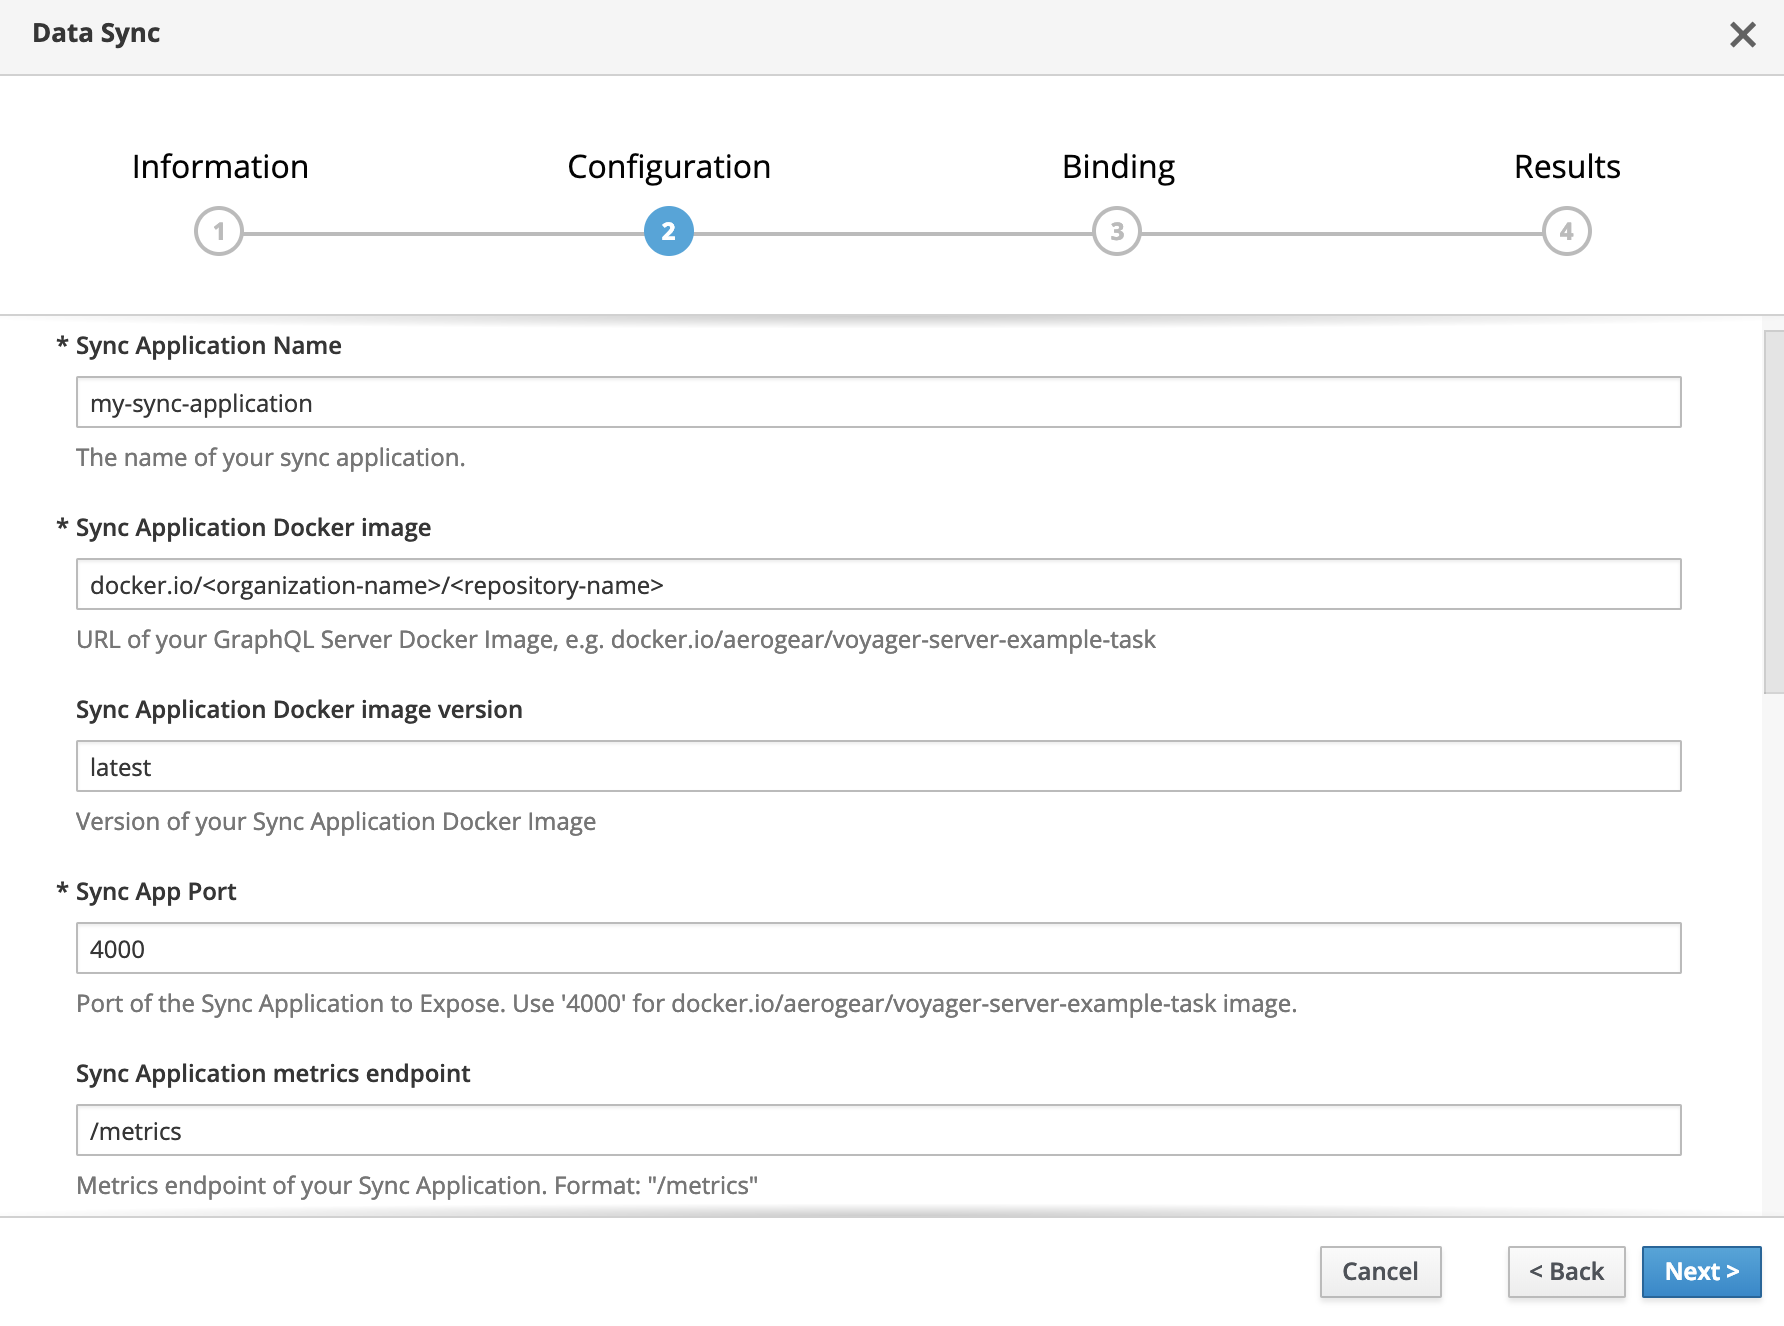
| Field | Default | Description |
|---|---|---|
Sync Application Name |
Fill in name of your Data Sync application |
|
Sync Application Docker image |
Fill in URL too your Data Sync application docker image |
|
Sync Application Docker image version |
latest |
Tag of your docker image |
Sync Application Port |
Port number that Data Sync application is listening on |
|
Sync Application metrics endpoint |
/metrics |
Path to the metrics endpoint (default value is recommended) |
Sync Application GraphQL Endpoint |
/graphql |
Path to the GraphQL endpoint (default value is recommended) |
Database Server Hostname |
Database server hostname that is used to connect by the Data Sync |
|
Database Server Port |
Database server port that is used to connect by the Data Sync |
|
Database Server Username |
Database server username that is used to connect by the Data Sync |
|
Database Server Password |
Database server password that is used to connect by the Data Sync |
|
Database name |
Name of the database that is used to connect by the Data Sync |
|
Use SSL? |
false |
Use SSL connection to the SQL server |
Once the wizard steps are completed, navigate to the Project Overview in OpenShift to see the newly provisioned service. Provisioning a service may take some time.
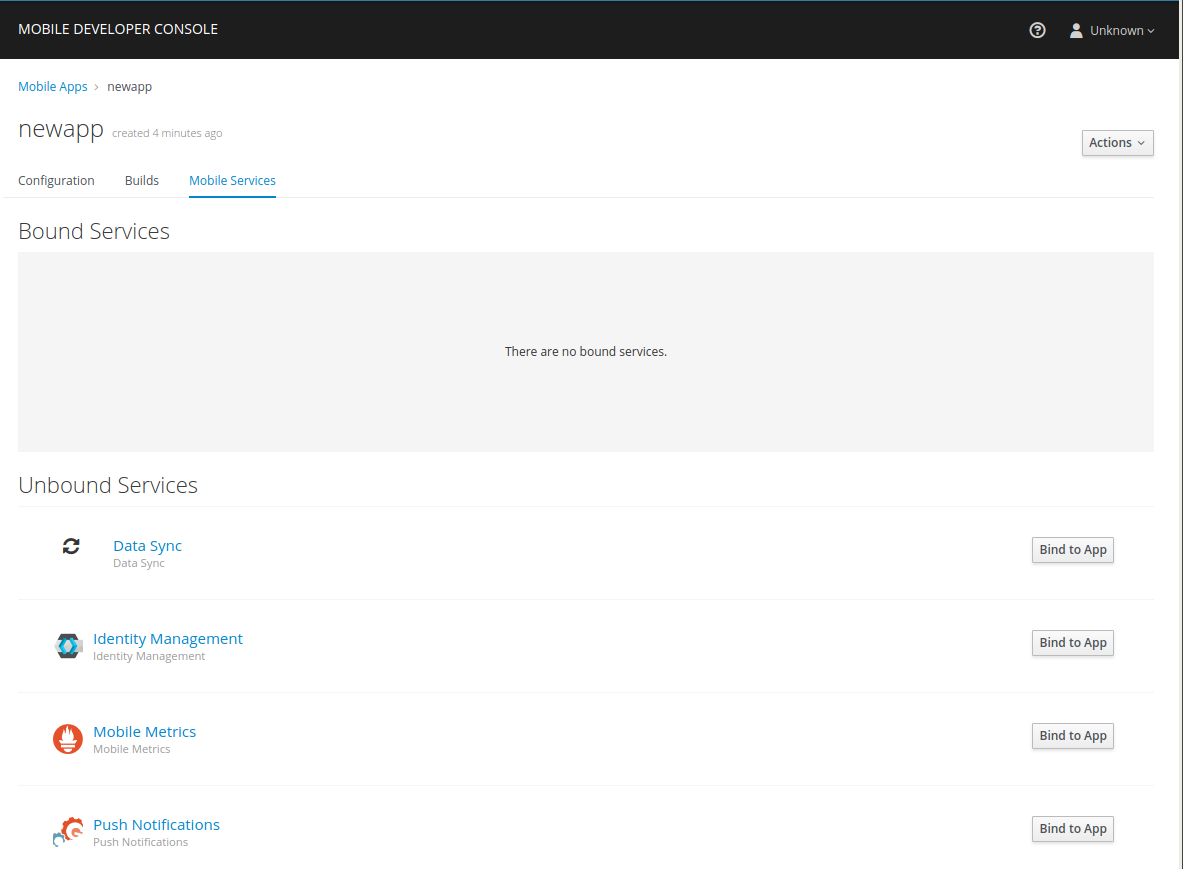
Once the provision is completed, you should be able to see it in the Mobile Developer Console: go to the Mobile Developer Console and click on any mobile client, and you should see the newly provisioned Data Sync server in the Unbound Services section. If you want your client app to use the Data Sync server, just click on Bind To App button and complete the wizard. Once it’s bound, copy the updated mobile-services.json file to your client app and you can then initialise the Data Sync client SDK.
Provisioning the Data Sync server applications using templates
Data Sync offers following OpenShift templates that will help developers with provisioning their DataSync applications to OpenShift platform.
Templates:
-
DataSync App
The DataSync App template allows developers to deploy the Node.js DataSync App on Openshift using source code only. Node s2i is used to build the DataSync App image.
The DataSync App can connect with other services running on OpenShift and can also connect to external data sources.
-
DataSync Showcase
Showcase application will deploy fully functional server with example Task implementation. Server side requires client application available on github aerogear/ionic-showcase
Note: Showcase server template can be used only for demo purposes and it should not be used in production.
When running on Red Hat Managed Integration templates will be available in Mobile > App category in OpenShift catalog
Templates along with documentation can be found in datasync-deployment repository.
Connecting a Client
-
You have access to an OpenShift cluster with the Service Catalog.
-
You have completed the OpenShift getting started guide.
-
You have created a mobile client and bound your data sync server.
-
You have completed the client getting started guide.
Once a service is bound to a mobile client, MDC will provide a mobile-services.json file that is used by the AeroGear client libraries to automatically configure the Data Sync client. It is very important that you use your version of this file and not the one used in this example as system specific values will be different.
Updating the Hello World Sync Client
The Hello World client application we wrote uses a hard coded server url. We need to remove this url and instead pass the mobile-services config to the client. We will also use the AeroGear core library to parse this file and pass that configuration to the Data Sync library.
const { init }  = require("@aerogear/app");

const core = init({
  "version": 1,
  "namespace": "myproject",
  "clientId": "getting-started",
  "services": [
    {
      "id": "0637bfd3-33aa-11e9-968e-52540014a8c2",
      "name": "sync-app-getting-started-getting-started",
      "type": "sync-app",
      "url": "https://sync-app-getting-started-myproject.192.168.42.138.nip.io/graphql",
      "config": {
        "websocketUrl": "wss://sync-app-getting-started-myproject.192.168.42.138.nip.io/graphql"
      }
    }
  ]
});
Once you have initialized the core, we can use it to configure the Data Sync client by setting the openShiftConfig property when we call createClient.
let client = await createClient({
    openShiftConfig:core.config
  });
And now, as before, we can use the client to make queries. A full example may look like the following code
import gql from 'graphql-tag';
const { init }  = require("@aerogear/app");
import { createClient } from '@aerogear/voyager-client';

const core = init({
  "version": 1,
  "namespace": "myproject",
  "clientId": "getting-started",
  "services": [
    {
      "id": "0637bfd3-33aa-11e9-968e-52540014a8c2",
      "name": "sync-app-getting-started-getting-started",
      "type": "sync-app",
      "url": "https://sync-app-getting-started-myproject.192.168.42.138.nip.io/graphql",
      "config": {
        "websocketUrl": "wss://sync-app-getting-started-myproject.192.168.42.138.nip.io/graphql"
      }
    }
  ]
});

async function helloWorld() {
  let client = await createClient({
    openShiftConfig:core.config
  });
  client.query({
      fetchPolicy: 'network-only',
      query: gql`{hello}`
    })
    .then( ({data}) => {
      console.log(data.hello)
    });
}

helloWorld();
Binding a Mobile App with the Data Sync server application service
To use Mobile Services, you must represent your mobile app in Mobile Developer Console, and that app must be associated with the mobile service. This association is called binding and it is necessary for your mobile app to use that service.
To bind a Mobile App with a mobile service:
-
Launch Mobile Developer Console
-
Click on the Mobile App on the Overview screen
-
Navigate to Mobile Services tab.
It is possible to bind a Mobile App with a mobile service in the OpenShift console, however such bindings are not valid for the purposes of this procedure. -
Press Bind to App in the Data Sync
-
Fill out the binding parameters required by the Data Sync Service.
Binding Data Sync to Identity Management
In this section, we will show you how to protect your Data Sync application using the Identity Management service.
-
There is a Identity Management service available.
-
You have provisioned a Data Sync application using our playbook.
-
oc tools must be installed
Any application that connects to Identity Management must consume a keycloak.json file. This section demonstrates how to add a keycloak.json file to your Data Sync application deployment. It is still your application’s responsibility to consume this file. We have provided an example project.
-
Create a client for your application in the Identity Management Administration Console
-
Click on the
Installationtab, selectKeycloak OIDC JSONforFormatOption, and then click onDownload. Save the downloadedkeycloak.json. -
Create a Identity Management secret:
oc create secret generic sync-keycloak-doc \
  --from-file=keycloak=./keycloak.json
The command creates a secret named
sync-keycloak-doc.The secret will contain one key,
keycloak, with the value being the text of thekeycloak.jsonfile.You can view the secret with either
oc get secret sync-keycloak-docor the OpenShift web console. -
Create a patch for your deployment configuration
This step requires patching the Data Sync application’s deployment config to create and mount a volume with the Identity Management secret we just created. Replace
$YOUR_DEPLOYMENT_CONFIG_NAMEin the following yaml section with the deployment config name of your Data Sync application and save this file assecret.yaml.spec: template: spec: containers: - env: - name: KEYCLOAK_CONFIG value: /config/keycloak.json name: $YOUR_DEPLOYMENT_CONFIG_NAME volumeMounts: - name: secret-volume mountPath: /config readOnly: true volumes: - name: secret-volume secret: items: - key: keycloak path: keycloak.json secretName: sync-keycloak-doc -
Apply the patch.
After replacing
$YOUR_DEPLOYMENT_CONFIG_NAMEwith the deployment config name, run the following command to patch the deployment configuration and trigger your application to redeploy.oc patch deploymentconfig $YOUR_DEPLOYMENT_CONFIG_NAME -p "$(cat secret.yaml)"Once your application has redeployed, it should be able to read the keycloak.json file pointed to by the KEYCLOAK_CONFIG environment variable.
Showcase App
The sample application demonstrates features offered by the Data Sync framework, including:
-
GraphQL Schema
-
Offline Storage
-
Conflict Resolution
-
Subscriptions
See the Showcase Apps section for instructions about how to run it.