AeroGear Mobile Security
Authentication and Session Management
| Do: | Do not: |
|---|---|
Perform Authentication on the Server Side. (The client side should never be trusted). |
Use the Fingerprint Scanner solely for Authentication. (Possible False Positives [1]). |
Use Randomly Generated access tokens instead of sending user credentials in requests. (At worst, a temporary session token can therefore only be stolen). |
Use Pattern Locks for Authentication. (Lack of Entropy, Vulnerable to Smudge Attacks [2]). |
A password policy is enforced at the remote endpoint. (Prevent easily guessable passwords from being used). |
Use a short Pin code solely authentication. (Easily brute forced and the end user may reuse the device security pin). |
Sessions are terminated at the remote endpoint after a predefined time. (Sessions token lifetimes should be kept short to limit the attack window if an valid session token is stolen). |
Do not use any values for authenticating a user like device identifiers or geo-location. (These can be spoofed easily). |
Temporarily lock out a user after a number of failed login attempts. (Prevent an endless brute force attack). |
Avoid relying on any roles or permission information that comes from the mobile device itself. (The client side and user input should not be trusted). |
Use contextual anomaly based detection to take into account the users IP, geographic location, time of day as part of the authentication phase. (Helps detect unusual login activity). |
Log user related information. (Personal information data leak) |
A second factor of authentication exists and is enforced. (Extra layer of protection in case another authentication factor has been compromised). |
Use OAuth1.0. (OAuth1.0 has been found to be vulnerable to session fixation. Use OAuth 1.0a or OAuth 2.0 instead). |
Step-up authentication is used for carrying out sensitive actions in an application. (Useful when a user’s device is stolen and they have already authenticated through the app). |
|
Allow the user to see their current login sessions and allow them to logout of other sessions via the app. (The end user will be able to detect rogue sessions with the most accuracy instead of using anomaly detection). |
|
Perform local integrity checks within the code to detect any unauthorized code changes before doing offline authentication. (Tampering may allow authentication bypasses). |
|
Where offline access to data is needed, perform an account/application lockout and/or application data wipe after X number of invalid password attempts. (Wipe application data when a threat is imminent). |
|
Perform a check at the start of each activity/screen to see if the user is in a logged in state and if not, switch to the login state. (A session could expire during use or over time. Also check that the user has a role that allows them to access to certain app view). |
|
When an application’s session is timed out, the application should discard and clear all memory associated with the user data, and any master keys used to decrypt the data. (Prevent data leakage after the user is no longer in an active session with the server). |
|
Store a masked user identifier instead of the actual username, and replace the user identifier value in authentication with a hash value. (If a username/id is being used in the mobile app for identification purposes only (not for display in the UI), then consider sending a related mapped token to the mobile device instead.). |
|
Implement Secure Password Recovery Mechanism. (To allow a user to recover their account using security questions only they should know the answers too and sending a recovery code using a side channel such as SMS). |
|
Fail authentication with a Generic Error. (The login screen should not show hints on the existence of a username/email address etc). |
References
-
The probability of a random person unlocking a given iPhone with Touch ID is 1 in 50,000. Apple Support
-
Penn State researchers managed to identify the pass code patterns on two smartphones, 68% of the time, using photographs taken under different lighting conditions, and camera positions. Smudge Attacks on Smartphone Touch Screens
Implementation
Native Android
|
|
|
|
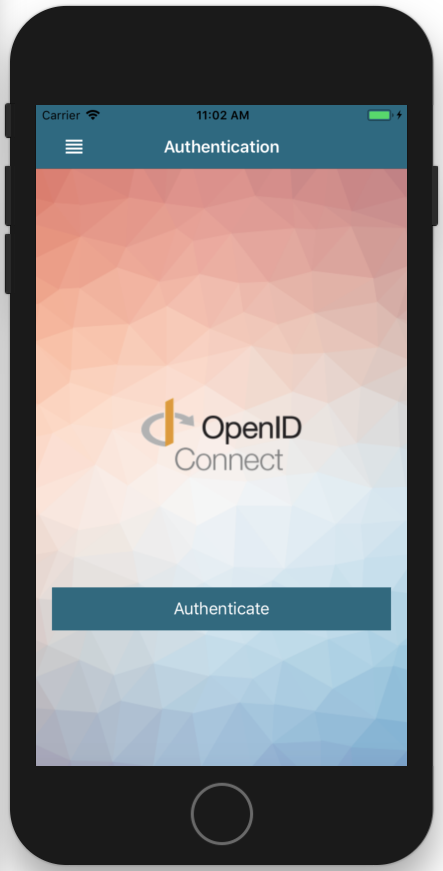
An Authentication and Session Management implementation has been provided in our Mobile Security Android Template App.
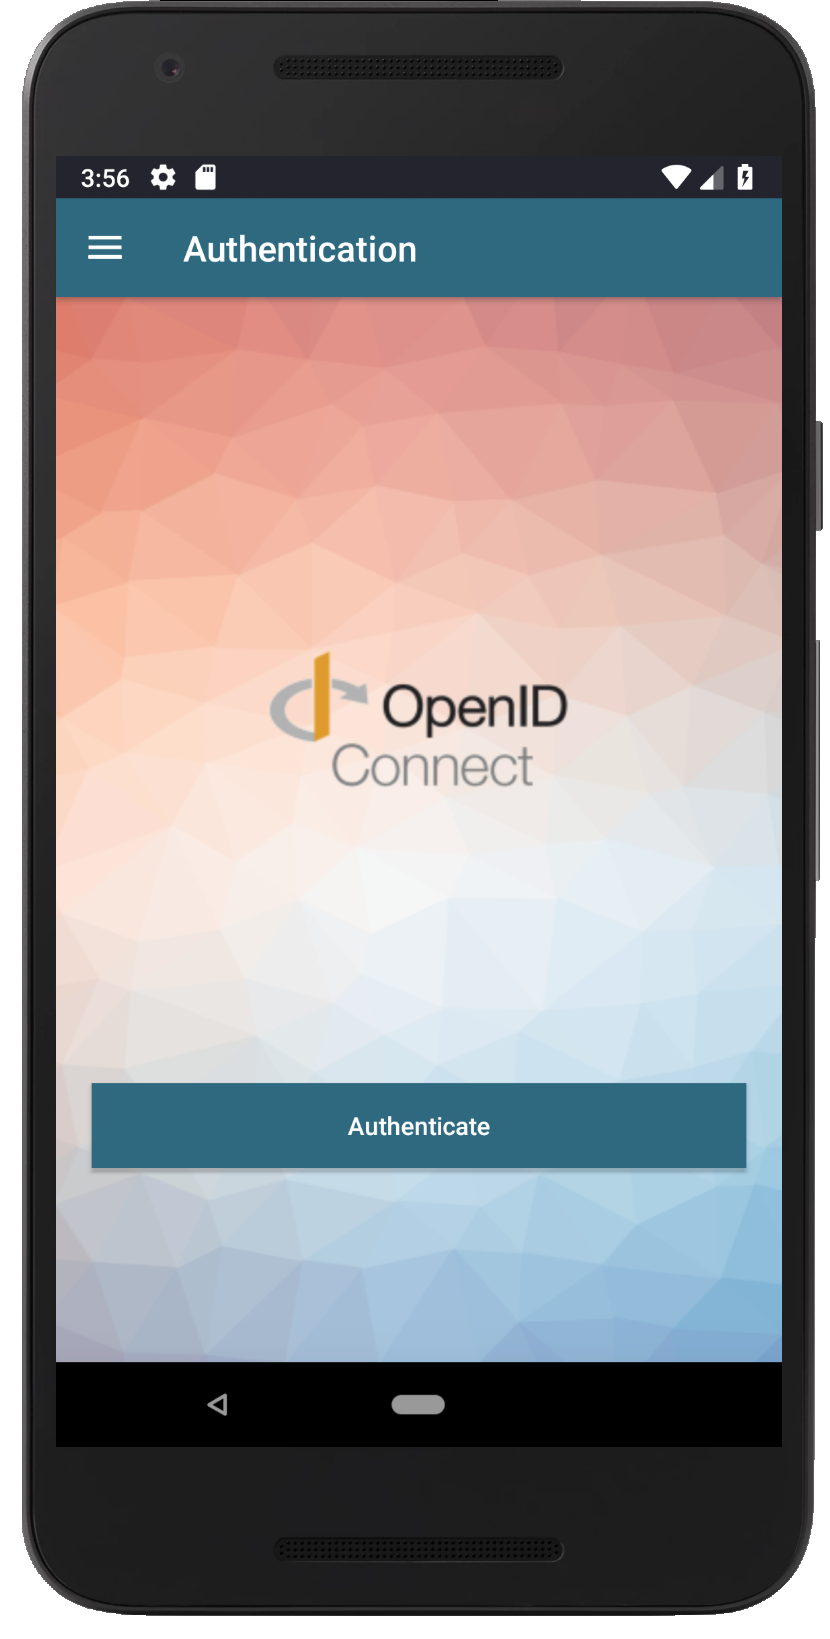
The Application uses OpenID Connect for authentication and access control. The Open Source Identity and Access Management server, Keycloak, is being used as an Identity Provider. The Aerogear Auth SDK is being used for communicating with the Keycloak server.
The Keycloak server is enforcing a number of Security Controls on the mobile app.
-
Brute force detection on the login screen.
-
Account lockouts for failed login attempts.
-
2FA for mobile users.
-
Session management for mobile users.
-
Audit tracing of auth events.
Code Examples
The main code logic is found under mobile-security-android-template/…/authentication.
The following code snippets describe the main authentication code logic in the mobile app.
Configuration
The Keycloak configuration is saved in the mobile-services.json file.
+include::https://raw.githubusercontent.com/aerogear/android-showcase-template/eacf9f364346d3eaa0cfc40f37aa53ae2696e17e/app/src/main/assets/mobile-services.json[]+The redirect url of the application is defined in android.defaultConfig.manifestPlaceholders of the apps build.gradle file.
You will also need to define the URL in the SecureApplicationModule.
@Provides @Singleton
AuthService provideAuthService(Context context, MobileCore mobileCore) {
    AuthService authService = mobileCore.getInstance(AuthService.class);
    AuthServiceConfiguration authServiceConfig = new AuthServiceConfiguration.AuthConfigurationBuilder()
            .withRedirectUri("com.feedhenry.securenativeandroidtemplate:/callback")
            .build();

    authService.init(context, authServiceConfig);
    return authService;
}
Authentication
We can then perform the auth request and create a new intent which will handle the auth response from the system browser. The authentication phase will occur in a system browser in a safe context outside of the application.
/**
 * Create the config for the initial Keycloak auth request to get a temporary token and create an intent to handle the response
 *
 * @param fromActivity the activity used to perform the login
 * @param authCallback the authentication callback
 */
@Override
public void login(final Activity fromActivity, final Callback authCallback) {

    // Build the options object and start the authentication flow. Provide an activity to handle the auth response.
    DefaultAuthenticateOptions options = new DefaultAuthenticateOptions(fromActivity, LOGIN_RESULT_CODE);
    authService.login(options, authCallback);
}
Handling the Authentication Response
Once the Authentication phase has ended, the user will be redirected back to the mobile app from the system browser. A check is performed in the MainActivity for incoming intents so the result can be handled by the authentication service.
@Override
protected void onActivityResult(int requestCode, int resultCode, Intent data) {
    if (requestCode == KeycloakAuthenticateProviderImpl.LOGIN_RESULT_CODE) {
        // The core will return the same instance of the auth service as before
        AuthService authService = MobileCore.getInstance().getService(AuthService.class);
        authService.handleAuthResult(data);
    }
}
Logout
To logout of the application, we must make a call to the logout endpoint on the OpenID Connect provider along with providing the identity token and a redirect URI.
/**
 * Perform a logout request against the openid connect server
 *
 * @param logoutCallback the logout callback
 */
public void logout(final CallbackHandler logoutCallback) {
    this.logoutCallback = logoutCallback;
    UserPrincipal currentUser = authService.currentUser();
    authService.logout(currentUser, new Callback<UserPrincipal>() {
        @Override
        public void onSuccess() {
            logoutSuccess();
        }

        @Override
        public void onError(Throwable error) {
            logoutFailed(error);
        }
    });
}
Native iOS
|
|
An Authentication and Session Management implementation has been provided in our Mobile Security iOS Template App.
The Application uses OpenID Connect for authentication and access control. The Open Source Identity and Access Management server, Keycloak, is being used as an Identity Provider. The Aerogear Auth SDK is being used to communicate with the Keycloak server.
The Keycloak server config is defined in the mobile-services.json file.
+include::https://raw.githubusercontent.com/aerogear/ios-showcase-template/58efd7744fd57b27145d27f5ed4459dab89fc7fa/ios-showcase-template/mobile-services.json[]+The startAuth() function handles the user authentication browser flow and the back-channel token exchange.
func startAuth(presentingViewController: UIViewController) {
    do {
        try self.authService.login(presentingViewController: presentingViewController, onCompleted: onLoginCompleted)
    } catch {
        fatalError("Unexpected error: \(error)")
    }
}
The resolveCurrentUser() returns the user profile, which can be used to retrieve user information and the auth tokens.
func resolveCurrentUser() -> User? {
let authService = self.appComponents.resolveAuthService()
return try! authService.currentUser()
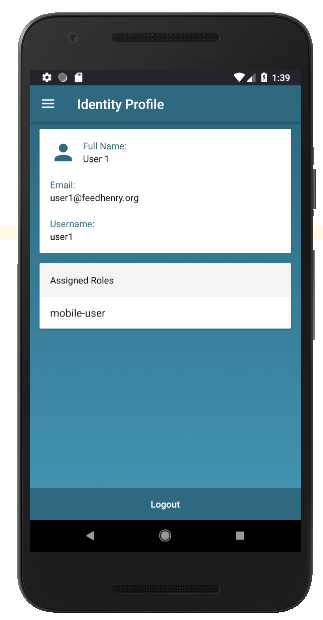
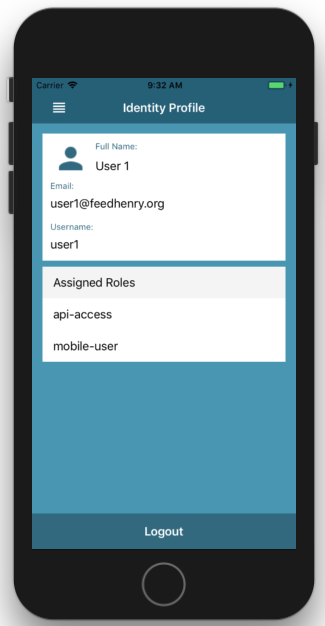
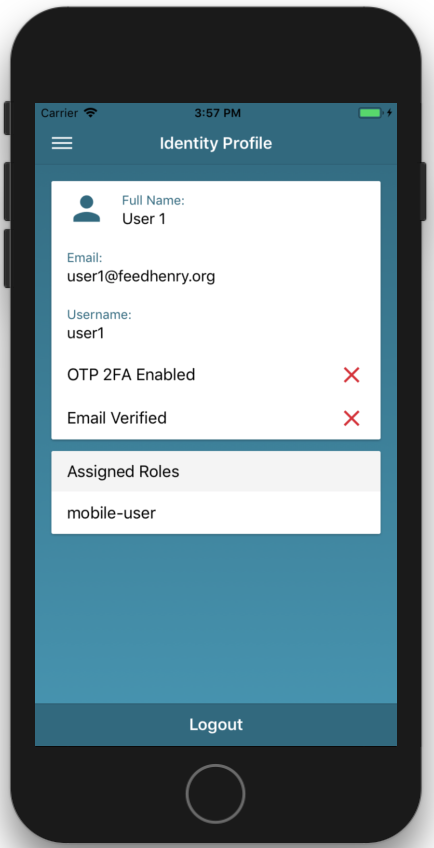
}The following information can be retrieved from an authenticated user:
// Get the users username
let username = currentUser.userName
// Get the users first name
let firstName = currentUser.firstName
// Get the users last name
let lastName = currentUser.lastName
// Get the users full name
let fullName = currentUser.fullName
// Get the users email address
let emailAddress = currentUser.email
// Get the users access token
let accessToken = currentUser.accessToken
// Get the users identity token
let identityToken = currentUser.identityToken
Access Control is carried out by checking the access roles of the authenticated user.
func highlightUserRealmRoles(user: User) {
    for realmRole in self.allRealmRoles {
        if user.hasRealmRole(realmRole.roleName) {
            setRoleAccessoryType(role: realmRole, type: UITableViewCellAccessoryType.checkmark)
        } else {
            setRoleAccessoryType(role: realmRole, type: UITableViewCellAccessoryType.none)
        }
    }
}
The logout() function is used to logout the user from the Keycloak server. The local auth tokens are also deleted.
func logout() {
    do {
        try self.authService.logout(onCompleted: { error in
            self.router?.leaveUserDetailsView(withError: error)
        })
    } catch {
        fatalError("Unexpected error: \(error)")
    }
}
Apache Cordova
The Keycloak JS library is being used to perform the OpenID Connect based authentication.
// Ensure that Keycloak is Initialised before Angular to prevent Redirect looping issues
KeycloakService.init()
.then(() => {
  const platform = platformBrowserDynamic();
  // Mamually intiliase angular
  platform.bootstrapModule(AppModule);
})
.catch((err) => console.error("Error Initalizing Keycloak", err));
The OpenID Connect Configuration can be found in the /config/keycloak.json file.
+include::https://raw.githubusercontent.com/feedhenry/mobile-security-cordova-template/c24297cda240efa40aca292e7d0657d7432d1eba/src/config/keycloak.json[]+The Keycloak JS adapter is initialised with the check-sso config to automatically detect and authenticate the user if there is a valid session on app resume.
/**
* Initialise the Keycloak Client Adapter
*/
static init(): Promise<any> {
  // Create a new Keycloak Client Instance
  let keycloakAuth: any = new Keycloak(keycloakConfig);

    return new Promise((resolve, reject) => {
      keycloakAuth.init({onLoad: 'check-sso'}).success(() => {
          KeycloakService.auth.authz = keycloakAuth;
          resolve();
        }).error((err) => {
          reject(err);
        });
    });
  }
The access token can be retrieved using the getToken() function.
/**
* Get Access Token
*/
getToken(): string {
return KeycloakService.auth.authz.token;
}
The user can logout using the logout() function.
/**
* Redirect to logout
*/
logout(): void {
  KeycloakService.auth.authz.logout();
}
The user can be redirected to the login screen using the login() function.
/**
 * Redirect to Login
 */
login(): void {
  KeycloakService.auth.authz.login();
}
The authentication state can ve cleared using the clearToken() function.
/**
 * Clears Authentication State
 */
clearToken(): void {
  KeycloakService.auth.authz.clearToken();
}
The end users realm level roles can be retrieved using the getRealmRoles() function.
/**
 * Return the users realm level roles
 */
getRealmRoles(): void {
  return KeycloakService.auth.authz.realmAccess.roles;
}
You can perform a check to see if the user has a given role using the hasRealmRole() function.
/**
 * Check if the user has a specified realm role
 */
hasRealmRole(role: String): boolean {
  return KeycloakService.auth.authz.hasRealmRole(role);
}
Information about the authentication server can be carried out using the getConfiguration() function.
/**
 * Get Server/Open ID Connect specific server info
 */
getConfiguration(): object {
  var notAvailable = "N/A";
  return {
    "authServerUrl": KeycloakService.auth.authz.authServerUrl ? KeycloakService.auth.authz.authServerUrl : notAvailable,
    "openIdFlow": KeycloakService.auth.authz.flow ? KeycloakService.auth.authz.flow : notAvailable,
    "openIdResponseMode": KeycloakService.auth.authz.responseMode ? KeycloakService.auth.authz.responseMode : notAvailable,
    "openIdResponseType": KeycloakService.auth.authz.responseType ? KeycloakService.auth.authz.responseType : notAvailable,
    "realm": KeycloakService.auth.authz.realm ? KeycloakService.auth.authz.realm : notAvailable,
    "clientId": KeycloakService.auth.authz.clientId ? KeycloakService.auth.authz.clientId : notAvailable,
    "timeSkew": KeycloakService.auth.authz.timeSkew ? KeycloakService.auth.authz.timeSkew : notAvailable
  };
}
The user can be redirected to the Keycloak account management screen using the accountManagement() function.
/**
 * Redirects to the Account Management Console
 */
accountManagement(): void {
  KeycloakService.auth.authz.accountManagement();
}
The users profile data can be retrieved using the loadUserProfile() function.
/**
 * Get the users profile
 */
loadUserProfile(): any {
  // Retrieve User Profile
  return new Promise((resolve, reject) => {
    KeycloakService.auth.authz.loadUserProfile().success((profile) => {
      resolve(<object>profile);
    }).error(() => {
      reject('Failed to retrieve user profile');
    });
  });
}
You can check if the user is authenticated using the isAuthenticated() function.
/**
 * Check if the user is authenticated
 */
isAuthenticated(): boolean {
    return KeycloakService.auth.authz.authenticated;
}
Data Storage Summary
Do: |
Do not: |
Classify data storage according to sensitivity and apply controls accordingly (To understand what information should be protected) |
Store any sensitive data on a mobile device where possible (Prevent data leak). |
When storing sensitive data on the device, use a file encryption API provided by the OS or other trusted source (Secure Cryptography) |
Write data to persistent memory accessible to other applications without encryption (Shared storage is untrusted) |
Use file encryption APIs which use a secret key protected by the device unlock code and deletable on remote wipe if available (Protect secret key) |
Including the keys in the same attacker-readable directory as the encrypted content (Can be used to decrypt data) |
Make use of remote wipe and kill switch APIs to remove sensitive information from the device in the event of theft or loss (Prevent data leak if the device is lost) |
Take screenshots contain sensitive data (Avoid sensitive data is exposed through screenshots) |
Use a time based (expiry) type of control which will wipe sensitive data from the mobile device once the application has not communicated with its servers for a given period of time (Less chance to decrypt data by using brute force) |
Leak permission-protected data to other applications (Prevent other apps access sensitive data) |
Automatic application shutdown and/or lockout after X minutes of inactivity (Less chance of data leak) |
Allow third party keyboards to be used for inputs that may contain sensitive data (Prevent data leak) |
Verify that OS level storage encryption is enabled and the device is protected by a PIN or passphrase (Ensure data encryption by default) |
Backup or synchronize sensitive data (Prevent data leak) |
Restrict the data that is shared with other applications (Prevent other apps access sensitive data) |
Log sensitive information (Prevent data leak through logs) |
Nullify any variables that hold keys after use (Secure keys in memory) |
using immutable objects for sensitive keys or passwords such as in Android java.lang.String and use char array instead (Secure keys in memory) |
Restrict broadcast messages (e.g., Android Broadcast Intents) to authorized applications (Prevent other apps access sensitive data) |
|
Disable Auto Correction and Autosuggestion for inputs that contain sensitive data (Prevent data leak) |
|
Disable cut, copy and paste functionalities for inputs that may contain sensitive data or restrict the pasteboard to be accessible only from this application (Prevent data leak) |
|
Delete application caches on app termination (Prevent data leak) |
|
Clear cookies and data in Webview on app termination (Prevent data leak) |
|
Remove sensitive data from views when in background (Prevent data leak) |
Implementation
Overview
We have implemented a secure storage feature in the sample mobile templates to allow users to manage secret notes. This feature is used to showcase the best practices around secure data storage.
Native Android
The secret notes can be saved to either file system or database (SQLite). In both cases, the notes will be encrypted automatically when persisted, and decrypted automatically when loaded into the app.
Secret Key Management
Secret keys are being used to encrypt/decrypt the notes. To make sure the secret keys are securely persisted, in most cases, the OS’s keystore should be used to persist the secret key.
However, for Android, there is a difference between Android M and pre-Android M.
Android M and later
In Android M and later versions, the KeyStore API supports generating and persist secret key, so the implementation is quite straight forward:
/**
 * Generate the AES key for encryption/decryption. The key will be 128bit and it can only be used with AES/GCM/NoPadding mode.
 * @param keyAlias the key alias
 * @throws GeneralSecurityException
 * @throws IOException
 */
@Override
public void generateAESKey(String keyAlias) throws GeneralSecurityException, IOException {
    KeyGenerator keyGenerator = KeyGenerator.getInstance(KeyProperties.KEY_ALGORITHM_AES, ANDROID_KEY_STORE);
    //TODO: further control if user authentication is required for accessing the keys
    KeyGenParameterSpec keyGenerationParameters = new KeyGenParameterSpec.Builder(keyAlias, KeyProperties.PURPOSE_ENCRYPT | KeyProperties.PURPOSE_DECRYPT)
            .setKeySize(AES_KEYSIZE_128)
            .setBlockModes(KeyProperties.BLOCK_MODE_GCM)
            .setEncryptionPaddings(KeyProperties.ENCRYPTION_PADDING_NONE)
            .setRandomizedEncryptionRequired(true)
            .build();
    keyGenerator.init(keyGenerationParameters);
    keyGenerator.generateKey();
}
Pre-Android M
However, in pre-Android M, the KeyStore API only supports generating public/private key pairs, so we can’t persist the secret key using the keystore.
Instead, we will have to:
-
Generate the secret key without using the KeyStore
Generate Secretprivate byte[] generateSecretKey(int size) throws NoSuchAlgorithmException { KeyGenerator keyGen = KeyGenerator.getInstance(KeyProperties.KEY_ALGORITHM_AES); keyGen.init(size); SecretKey secretKey = keyGen.generateKey(); return secretKey.getEncoded(); } -
Generate a public/private key pair using the KeyStore
Generate Keypair@Override public void generatePrivateKeyPair(String keyAlias) throws GeneralSecurityException, IOException { //pre android-M, the keystore only support RSA key generation. So here we will generate a RSA keypair first, then generate the AES key. //we then encrypt the AES key using the generated RSA public key, and save it using the SharedPreferences Calendar start = Calendar.getInstance(); Calendar end = Calendar.getInstance(); end.add(Calendar.YEAR, 99); KeyPairGeneratorSpec generatorSpec = new KeyPairGeneratorSpec .Builder(context) .setAlias(keyAlias) .setSubject(new X500Principal("CN=" + keyAlias)) .setSerialNumber(BigInteger.TEN) .setStartDate(start.getTime()) .setEndDate(end.getTime()) .build(); KeyPairGenerator generator = KeyPairGenerator.getInstance(KeyProperties.KEY_ALGORITHM_RSA, ANDROID_KEY_STORE); generator.initialize(generatorSpec); generator.generateKeyPair(); } -
Encrypt the generated secret key with the generated public key and persist the encrypted secret key using private SharedPreferences.
Encrypt Secret@Override public void generateAESKey(String keyAlias) throws GeneralSecurityException, IOException { byte[] secretKey = generateSecretKey(AES_KEYSIZE_128); byte[] encryptedKey = rsaEncrypt(secretKey); String encodedSecretKey = Base64.encodeToString(encryptedKey, BASE64_FLAG); SharedPreferences.Editor editor = this.sharedPreferences.edit(); editor.putString(keyAlias, encodedSecretKey); editor.commit(); } -
To load the secret key, the generated key pair needs to be loaded first, and then use the private key to decrypt the encrypted secret key.
Decrypt Secret@Override public Key getSecretKey(String keyAlias) throws GeneralSecurityException, IOException { String encodedKey = this.sharedPreferences.getString(keyAlias, null); if (encodedKey != null) { byte[] encryptedKeyBytes = Base64.decode(encodedKey, BASE64_FLAG); byte[] keyBytes = rsaDecrypt(encryptedKeyBytes); return new SecretKeySpec(keyBytes, KeyProperties.KEY_ALGORITHM_AES); } return null; }
The alternative option is to ask the user to provide a password. The password will be used to encrypt/decrypt the secret key. This does mean that the user will have to remember the password and enter it every time when using the app.
Encrypt/decrypt the secret key
RSA encryption/decryption is used to encrypt/decrypt the secret key. It can be used to encrypt/decrypt relatively small amount of data.
You can perform RSA encryption/decryption in Android like this:
/**
 * Perform encryption using RSA
 * @param mode the RSA encryption alg
 * @param keyEntry the private/public key entry
 * @param text the data to encrypt
 * @return the encrypted ddata
 * @throws GeneralSecurityException
 * @throws IOException
 */
public static byte[] encrypt(String mode, KeyStore.PrivateKeyEntry keyEntry, byte[] text) throws GeneralSecurityException, IOException {
    // Encrypt the text
    Cipher inputCipher = Cipher.getInstance(mode);
    inputCipher.init(Cipher.ENCRYPT_MODE, keyEntry.getCertificate().getPublicKey());
    //The key to encrypt should be either 16 (128 bit) or 32 (256 bit) in size, well below the block size for RSA (should be around 214 bytes)
    ByteArrayOutputStream outputStream = new ByteArrayOutputStream();
    CipherOutputStream cipherOutputStream = new CipherOutputStream(outputStream, inputCipher);
    cipherOutputStream.write(text);
    cipherOutputStream.close();

    byte[] vals = outputStream.toByteArray();
    return vals;
}/**
* Encrypt the given text.
* @param keyAlias The alias of the key in the keystore that will be used for the encryption.
* @param plainText the text to encrypt
* @return the encrypted data. The first 12 bytes will be the IV (initial vector) used for the encryption.
* @throws GeneralSecurityException
* @throws IOException
*/
public byte[] encrypt(String keyAlias, byte[] plainText) throws GeneralSecurityException, IOException {
SecretKey secretKey = loadOrGenerateSecretKey(keyAlias, true);
Cipher cipher = Cipher.getInstance(secureKeyStore.getSupportedAESMode());
cipher.init(Cipher.ENCRYPT_MODE, secretKey);
//get the iv that is being used
byte[] iv = cipher.getIV();
byte[] encrypted = cipher.doFinal(plainText);
GCMEncrypted encryptedData = new GCMEncrypted(iv, encrypted);
return encryptedData.toByteArray();
}Encrypt/decrypt the content of notes
Once we have the secret key, we can use it to encrypt/decrypt the content of the notes using AES.
You can perform data encryption/decryption in Android like this:
/**
 * Encrypt the given text.
 * @param keyAlias The alias of the key in the keystore that will be used for the encryption.
 * @param plainText the text to encrypt
 * @return the encrypted data. The first 12 bytes will be the IV (initial vector) used for the encryption.
 * @throws GeneralSecurityException
 * @throws IOException
 */
public byte[] encrypt(String keyAlias, byte[] plainText) throws GeneralSecurityException, IOException {
    SecretKey secretKey = loadOrGenerateSecretKey(keyAlias, true);
    Cipher cipher = Cipher.getInstance(secureKeyStore.getSupportedAESMode());
    cipher.init(Cipher.ENCRYPT_MODE, secretKey);
    //get the iv that is being used
    byte[] iv = cipher.getIV();
    byte[] encrypted = cipher.doFinal(plainText);
    GCMEncrypted encryptedData = new GCMEncrypted(iv, encrypted);
    return encryptedData.toByteArray();
}/**
* Decrypt the given encrypted data
* @param keyAlias The alias of the key in the keystore that will be used for the decryption.
* @param encryptedText the text to decrypt. The first 12 bytes should be the IV used for encryption.
* @return the plain text data
* @throws GeneralSecurityException
* @throws IOException
*/
public byte[] decrypt(String keyAlias, byte[] encryptedText) throws GeneralSecurityException, IOException {
GCMEncrypted encryptedData = GCMEncrypted.parse(encryptedText);
SecretKey secretKey = loadOrGenerateSecretKey(keyAlias, false);
Cipher cipher = Cipher.getInstance(secureKeyStore.getSupportedAESMode());
cipher.init(Cipher.DECRYPT_MODE, secretKey, new GCMParameterSpec(GCMEncrypted.GCM_TAG_LENGTH, encryptedData.iv));
byte[] plainText = cipher.doFinal(encryptedData.encryptedData);
return plainText;
}Persist data using file system
When a secret note is created, it can be persisted to the file system. We should encrypt the file when it is being persisted, and decrypt it when it is being loaded:
/**
 * Encrypt the file when saving to the file system
 * @param fileName the name of the file
 * @param fileContent the content of the file
 * @throws IOException
 * @throws GeneralSecurityException
 */
private void writeFileWithEncryption(String fileName, String fileContent) throws IOException, GeneralSecurityException {
    File outputFile = new File(context.getFilesDir(), fileName);
    if (!outputFile.exists()) {
        outputFile.createNewFile();
    }
    OutputStream outStream = aesCrypto.encryptStream(fileName, new FileOutputStream(outputFile));
    outStream.write(fileContent.getBytes("utf-8"));
    outStream.flush();
    outStream.close();
}/**
* Read the content of the file, and decrypt it automatically
* @param fileName the name of the file
* @return the decrypted file content
* @throws IOException
* @throws GeneralSecurityException
*/
private String readFileWithDecryption(String fileName) throws IOException, GeneralSecurityException {
InputStream inputStream = context.openFileInput(fileName);
InputStream decryptedStream = aesCrypto.decryptStream(fileName, inputStream);
return StreamUtils.readStream(decryptedStream);
}Persist data using database (SQLite)
To securely persist data to the database, a library called SqlCipher is used. The library will automatically manage the encryption/decryption of the sqlite database file. It is easy to use, and requires minimum changes to the code.
To encrypt/decrypt the database, a password is required. You can ask the user to provide the password. In our sample application, we generated a random password and then protected using a public/private key pair. The password is saved to the private SharedPreferences.
/**
 * Get the password to protect the database
 * @return the password
 * @throws GeneralSecurityException
 * @throws IOException
 */
private String getDbPassword() throws GeneralSecurityException, IOException {
    String encryptedDbPass = this.sharedPreferences.getString(DB_KEY_PREF_NAME, null);
    if (encryptedDbPass == null) {
        String passwordToEncrypt = randomPassword();
        encryptedDbPass = Base64.encodeToString(rsaCrypto.encrypt(ENCRYPT_KEY_ALIAS, passwordToEncrypt.getBytes("utf-8")), Base64.NO_WRAP);
        SharedPreferences.Editor editor = this.sharedPreferences.edit();
        editor.putString(DB_KEY_PREF_NAME, encryptedDbPass).commit();
    }
    String password = new String(rsaCrypto.decrypt(ENCRYPT_KEY_ALIAS, Base64.decode(encryptedDbPass, Base64.NO_WRAP)), "utf-8");
    return password;
}
Native iOS
The secret notes are being persisted using an encrypted Realm Mobile DB.
Initialising Realm DB
The Realm DB storing the notes must be initialised using the encryption key.
/**
 - Initilise the Realm Storage Service

 - Parameter kcWrapper: the swift keychain wrapper
 */
init(kcWrapper: KeychainWrapper, encryptionKey: Data) {
    self.keychainWrapper = kcWrapper
    self.encryptionKey = encryptionKey
}
The encryption key is stored in the iOS Keychain.
/**
 - Get the encryption key for the realm db

 - Parameter kcWrapper: the keychain wrapper instance
 - Parameter keychainAlias: the refernence alias for the encryption key stored in the keychain

 - Returns: the encryption key
 */
class func getEncryptionKey(kcWrapper: KeychainWrapper, keychainAlias: String) -> Data? {
    guard let encryptionKey = kcWrapper.data(forKey: keychainAlias) else {
        let newEncryptionKey = generateEncryptionKey()
        kcWrapper.set(newEncryptionKey, forKey: keychainAlias)
        return newEncryptionKey
    }
    return encryptionKey
}
When the application is initialised for the first time, a new encryption key is randomly generated.
/**
 - Generate an encryption key for the realm db

 - Returns: An encryption key
 */
    class func generateEncryptionKey() -> Data {
    let byteLength = 64
    let randomNumberSize = 1000000
    let bytes = [UInt32](repeating: 0, count: byteLength).map { _ in arc4random_uniform(UInt32(randomNumberSize)) }
    let data = Data(bytes: bytes, count: byteLength)
    return data
}
Interacting with Realm DB
Interactions with the Realm DB are performed on background threads. Completion handlers are used to pass information to the view controllers on the Main thread.
Listing Notes
List all the notes.
/**
 - List the stored entities from the realm db

 - Parameter onComplete - a closure called after retrieval
 */
func list(onComplete: @escaping (Error?, [Note]?) -> Void) {
    DispatchQueue.global(qos: .background).async {
        do {
            // create a new thread confined realm
            let realm = try self.getRealmInstance()

            // synchronization of Realm instance to the latest version on the background thread
            realm.refresh()

            // retieve the notes from realm
            let notesResult = realm.objects(Note.self)

            // create a new thread safe reference for these notes
            let threadSafeNotes = ThreadSafeReference(to: notesResult)

            // return note to the view controller on the main thread
            DispatchQueue.main.async() {
                let realm = try! self.getRealmInstance()

                // get the notes using the thread safe reference
                guard let notes = realm.resolve(threadSafeNotes) else {
                    return
                }

                // convert the notes to array format
                let notesArray = notes.toArray()

                onComplete(nil, notesArray)
            }
        } catch {
            onComplete(error, nil)
        }
    }
}
Creating a Note
Create an individual note.
/**
 - Create the stored entity

 - Paramater title: the title of the note
 - Paramater content: the content of the note
 - Parameter onComplete - a closure called after creation
 */
func create(title: String, content: String, onComplete: @escaping (Error?, Note?) -> Void) {
    var id = generateId()
    let createdAt = getDate()

    // ensure the ID is unique
    while !isIdentifierUnique(identifier: id) {
        id = generateId()
    }

    // create the note object
    let note = Note()
    note.id = id
    note.title = title
    note.content = content
    note.createdAt = createdAt
    note.storageProvider = "Realm"

    DispatchQueue.global(qos: .background).async {
        // create the note in the db
        do {
            // create a new thread confined realm
            let realm = try self.getRealmInstance()
            try realm.safeWrite {
                realm.add(note)
                try! realm.commitWrite()
                onComplete(nil, note.clone())
            }
        } catch {
            onComplete(error, nil)
        }
    }
}
Read a Note
Read an individual note.
/**
 - Read the stored entity

 - Parameter identifier: The identifier of the note
 - Parameter onComplete - a closure called after retrieval
 */
func read(identifier: Int, onComplete: @escaping (Error?, Note?) -> Void) {
    DispatchQueue.global(qos: .background).async {
        do {
            // create a new thread confined realm
            let realm = try self.getRealmInstance()

            // retrieve the notes from realm
            let noteResult = realm.objects(Note.self).filter("id = \(identifier)")

            // create a new thread safe reference for these notes
            let threadSafeNotes = ThreadSafeReference(to: noteResult)

            // return note to the view controller on the main thread
            DispatchQueue.main.async() {
                let realm = try! self.getRealmInstance()

                // get the notes using the thread safe reference
                guard let notes = realm.resolve(threadSafeNotes) else {
                    return
                }

                // extract the note from the list
                let note = notes.first

                onComplete(nil, note?.clone())
            }
        } catch {
            onComplete(error, nil)
        }
    }
}
Edit a Note
Edit an individual note.
/**
 - Edit the stored entity

 - Parameter identifier: The identifier of the note
 - Parameter title: The title of the note
 - Parameter content: The content of the note
 - Parameter onComplete - a closure called after editing
 */
func edit(identifier: Int, title: String, content: String, onComplete: @escaping (Error?, Note?) -> Void) {
    DispatchQueue.global(qos: .background).async {
        do {
            // create a new thread confined realm
            let realm = try self.getRealmInstance()

            // get the existing note to update
            let notes = realm.objects(Note.self).filter("id = \(identifier)")
            let note = notes.first

            // update the note with the given id
            try realm.write {
                note?.title = title
                note?.content = content
            }
            onComplete(nil, note?.clone())
        } catch {
            onComplete(error, nil)
        }
    }
}
Delete a Note
Delete an individual note.
/**
 - Delete the stored entity

 - Parameter identifier: The identifier of the note
 - Parameter onComplete - a closure called after deletion
 */
func delete(identifier: Int, onComplete: @escaping (Error?, Note?) -> Void) {
    DispatchQueue.global(qos: .background).async {
        do {
            // create a new thread confined realm
            let realm = try self.getRealmInstance()

            // get the note to delete
            let noteToDeleteResult = realm.objects(Note.self).filter("id = \(identifier)")
            let note = noteToDeleteResult.first
            let returnNote = note?.clone()

            // delete the note
            try realm.write {
                realm.delete((note)!)
            }
            onComplete(nil, returnNote)
        } catch {
            onComplete(error, nil)
        }

    }
}
Delete all Notes
Delete all notes.
/**
 - Delete all stored entitities

 - Parameter onComplete - a closure called after deletion
 */
func deleteAll(onComplete: @escaping (Error?, Bool?) -> Void) {
    DispatchQueue.global(qos: .background).async {
        do {
            // create a new thread confined realm
            let realm = try self.getRealmInstance()

            let notes = realm.objects(Note.self)

            // delete all the notes
            try realm.write {
                realm.delete(notes)
            }
            onComplete(nil, true)
        } catch {
            onComplete(error, nil)
        }
    }
}
Network Security
| Do: | Do not: |
|---|---|
Include a Backup Cert Pin. (Retain app connectivity if new keys on server are used or the CA is changed). |
Pin the full certificate. (The full cert, and potentially backup certs are available for inspection, the certificate is bundled with the app meaning that when a cert expires the app must be rebuilt with a new cert). |
Perform Certificate Pinning using the hash of the public key - SubjectPublicKeyInfo of the X.509 certificate. (Allows you to anonymize a certificate or public key and ensures an attacker does not see the reserved certificate or public key in advance of its use). |
Send sensitive data without certificate pinning. (Creates higher risk as an attacker with network privileges, or who has compromised TLS, is better positioned to intercept data). |
Perform proper certificate validation if the platform doesn’t allow true certificate pinning. (Adds an extra precautionary check when sending sensitive data). |
Establish connections with endpoints that offer a different certificate or key, even if signed by a trusted CA. (The channel is not trusted.) |
Use TLS for network encryption. (SSL 2.0 and 3.0 have been deprecated by the IETF). |
Use Mixed SSL sessions. (The users session ID can be exposed over non HTTPS requests). |
Use a secure channel consistently throughout the app. (Ensure that some network calls are not sent in plaintext). |
Use localhost network ports for handling sensitive IPC. (The interface is accessible by other applications on the device). |
Verify that the app doesn’t rely on a single insecure communication channel such as email or SMS for critical operations, such as enrollments and account recovery. (Use a hardware token or secure channel as GCM or Apple Push notifications). |
Don’t rely on unauthenticated SMS data to perform sensitive commands. (The input may be malicious, be spoofed or sniffed using another app with SMS read permissions). |
Verify that the app uses some form of whitelisting to control access to external domains. (Limit the outbound requests to predefined trusted domains). |
Avoid sending crash logs over the network in plaintext. (Logs can contain sensitive or important information about the user and/or the application). |
Pay particular attention to validating all data received from and sent to non-trusted third party apps/plugins before incorporating their use into an application. (Some plugins can interact with ad networks etc). |
|
Consider using HTTP Strict Transport Security (HSTS). (Protect against protocol downgrade attacks and cookie hijacking). |
|
Make sure that you don’t trust data downloaded from HTTP or other insecure protocols. (Validate the data before using it in an application). |
|
Require User Approval before Executing a Function that Transmits PII over a Network. (Inform the user that their data is being transferred over a network or being sent to another location). |
|
For highly sensitive values, implement additional encryption in transit. (Improved protection in case the secure channel somehow compromised). |
Implementation
Overview
A number of features were added to enhance the security of the channel between the Mobile App and the Authentication or API Server.
Android
Certificate Pinning
The main code logic for certificate pinning is found under here in the CertPinningHelper class.
Certificate Pinning has been implemented in the Application using the SPKI technique. This ensures easier maintenance and improved security by anonymizing the certificate information in the application. The TrustKit Android library is being utilised to allow certificate pinning to work with older API levels.
The Android Network Security Configuration XML file defined the pins of the server you want to pin against.
+include::https://raw.githubusercontent.com/feedhenry/mobile-security-android-template/bbb41ca86b52b2e9fd380097580a8d946258827c/app/src/main/res/xml/network_security_config.xml[]+You can get the pin for a website using OpenSSL:
openssl s_client -servername www.example.com -connect www.example.com:443 | openssl x509 -pubkey -noout | openssl pkey -pubin -outform der | openssl dgst -sha256 -binary | openssl enc -base64A HTTP request function has been created to perform requests to the Authentication servers. The createRequest() functions performs pinning verification on the requests.
/**
 * Make a request to a resource that requires the access token to be sent with the request
 *
 * @param requestUrl the request URL
 * @param sendAccessToken boolean on whether to send the access token as part of the request
 * @param callback the OkHTTP callback for the request
 */
public Call createRequest(final String requestUrl, final boolean sendAccessToken, final okhttp3.Callback callback) {

    URL url = null;
    try {
        url = new URL(requestUrl);
    } catch (MalformedURLException e) {
        e.printStackTrace();
    }
    String serverHostname = url.getHost();

    HttpsURLConnection connection = null;
    try {
        connection = (HttpsURLConnection) url.openConnection();
    } catch (IOException e) {
        e.printStackTrace();
    }

    SSLSocketFactory sslSocketFactory = TrustKit.getInstance().getSSLSocketFactory(serverHostname);
    X509TrustManager trustManager = TrustKit.getInstance().getTrustManager(serverHostname);
    connection.setSSLSocketFactory(sslSocketFactory);

    OkHttpClient httpClient = HttpHelper.getHttpClient()
            .sslSocketFactory(sslSocketFactory, trustManager)
            .connectTimeout(10, TimeUnit.SECONDS)
            .build();

    Request request;

    if (sendAccessToken) {

        String accessToken = authService.currentUser().getAccessToken();

        request = new Request.Builder()
                .url(url)
                .addHeader("Authorization", String.format("Bearer %s", accessToken))
                .build();
    } else {
        request = new Request.Builder()
                .url(url)
                .build();
    }


    Call call = httpClient.newCall(request);
    call.enqueue(callback);
    return call;
}
A function has also been provided to check if the OkHTTP callback failure exception was due to a certificate validation issue.
/**
 * Check if an exception is caused by a certificate verification error
 *
 * @param error the error exception from a failed request
 *
 * @return boolean based on whether or not certificate pinning has failed
 */
public boolean checkCertificateVerificationError(final Exception error) {
    boolean certificateVerificationError = false;
    if (error.getCause() != null &&
            (error.getCause().toString().contains("Certificate validation failed") ||
                    error.getCause().toString().contains("Pin verification failed"))) {
        certificateVerificationError = true;
    }
    return certificateVerificationError;
}
Invoking remote APIs
When remote APIs are being invoked, before sending the data, you should make sure the client does have the required permission. If the client doesn’t have the required permission, the client should not perform the request at all:
@Override
protected ClientStatus doInBackground(Void... voids) {
    ClientStatus status = null;
    try {
        UserPrincipal user = authService.currentUser();
        if (user != null ) {
            boolean hasPermission = user.hasRealmRole(requiredRole);
            long numberOfNotes = noteRepository.count();
            status = new ClientStatus(hasPermission, numberOfNotes);
            return status;
        }
    } catch (Exception e) {
        Log.e(TAG, "Error - Exception", e);
        this.error = e;
    }
    return status;
}
However, just checking the permission on the client is not enough. You should always check the user permission on the backend API server as well:
const keycloak = new Keycloak({ store: memoryStore }, config.keycloak);

app.use(keycloak.middleware());
app.use('/', keycloak.protect('realm:api-access'), routes);
You should also perform certificate pinning checks when calling remote APIs:
@Override
protected Long doInBackground(Void... voids) {
    String apiUrl = apiServerConfiguration.getNoteAPIUrl();

    UserPrincipal user = authService.currentUser();
    if (user != null ) {
        String accessToken = user.getAccessToken();
        try {
            List<Note> notes = noteRepository.listNotes();
            long totalNumber = notes.size();
            final AtomicLong currentCount = new AtomicLong(0);
            for (Note note : notes) {
                if (isCancelled() || this.error != null) {
                    break;
                }
                Note readNote = noteRepository.readNote(note.getId());
                HttpRequest httpRequest = mobileCore.getHttpLayer().newRequest();
                httpRequest.addHeader("Authorization", String.format("Bearer %s", accessToken));
                httpRequest.post(apiUrl, readNote.toJson(true).toString().getBytes("UTF-8"));
                HttpResponse httpResponse = httpRequest.execute();

                httpResponse.onError(() -> {
                    UploadNotesTask.this.error = new Exception(httpResponse.stringBody());
                });
                httpResponse.onSuccess(() -> {
                    uploaded.incrementAndGet();
                });
                httpResponse.onComplete(() -> {
                    long progress = currentCount.incrementAndGet();
                    publishProgress(progress, totalNumber);
                });

                httpResponse.waitForCompletionAndClose();
            }
        } catch (Exception e) {
            Log.e(TAG, "Error - Exception", e);
            this.error = e;
        }
    }
    return uploaded.longValue();
}
iOS
Certificate Pinning
The Certificate Pinning Service and the AppDelegate contain the main code for configuring and performing certificate pinning. The TrustKit library is being used to perform SPKI Certificate Pinning. The pin is a Base64 encoded Subject Public Key Information fingerprint from an X.509 Certificate.
You can get the pin for a website using OpenSSL:
openssl s_client -servername www.example.com -connect www.example.com:443 | openssl x509 -pubkey -noout | openssl pkey -pubin -outform der | openssl dgst -sha256 -binary | openssl enc -base64TrustKit can be configured and initialised from the AppDelegate file. TrustKit is configured below to perform swizzling of the App’s NSURLConnection and NSURLSession delegates in order to automatically add pinning validation to the App’s HTTPS connections.
// Define TrustKit configuration
let trustKitConfig = [
    kTSKSwizzleNetworkDelegates: true,
    kTSKPinnedDomains: [
        "security.feedhenry.org": [
            kTSKIncludeSubdomains : true,
            kTSKEnforcePinning : true,
            kTSKPublicKeyAlgorithms: [kTSKAlgorithmRsa2048],
            kTSKPublicKeyHashes: [
                "trENjoQnbWupnAtu1/WagBE0RgJ+p7ke2ppWML8vAl0=",
                "arENjoQnbWupnAtu1/WagBE0RgJ+p7ke2ppWML8vAl0="
            ],]]] as [String : Any]

// Init TrustKit with the above config
TrustKit.initSharedInstance(withConfiguration: trustKitConfig)
The performValidCertCheck() function in the Certificate Pinning Service can be used to manually check if a request to a host fails due to certificate pinning validation issues.
/*
 - Checks if the servers presented cert matches a pin from the pinset

 - Parameter url - the url of the host to check. If no URL is provided, the auth server will be tested by default.

 - Parameter onCompleted - a completion handler that returns the result of the cert check. A true value means that the cert pinning validated successfully. A false value means there was a validation issue which resulted in a pin verification failure.
 */
func performValidCertCheck(url:String? = nil, onCompleted: @escaping (Bool) -> Void) {
    let serviceURL = AgsCore.instance.getConfiguration("keycloak")?.url
    let requestURL = url ?? "\(serviceURL)/auth/"

    Alamofire.request(requestURL).validate(statusCode: 200..<300).responseData(completionHandler: {response in
        switch response.result {
        case .success:
            onCompleted(true)
        case .failure(let error):
            if(!self.checkPinningFailed(error: error)) {
                // error is not cert pinning related
                onCompleted(true)
            } else {
                onCompleted(false)
            }
        }
    })
}
The outcome of the certificate checks can then be used to warn the user if a secure channel is not available. In the example below, pinning is performed when the authentication button is pressed. If there are certificate validation issues, the end user will not be allowed to authenticate and the UI is updated to warn them that their connection to the remote server is not secure.
@IBAction func onAuthButtonTapped(_ sender: UIButton) {
    // perform cert pinning on the auth server when the auth button is pressed
    if let listener = self.authListener {
        listener.performPreCertCheck() {
            validCert in
            if(validCert) {
                // cert is valid, continue with login
                listener.startAuth(presentingViewController: self)
            } else {
                // pin validation issues, update the UI to notify the user and prevent authentication.
                self.authenticationButton.isHidden = true
                self.certPinningError.isHidden = false
                self.logoImage.isHidden = true
                self.dangerLogo.isHidden = false
                self.backgroundImage.image = UIImage(named: "ic_error_background")
            }
        }
    }
}
Apache Cordova
Certificate Pinning
Certificate Pinning is being performed on preflight requests to ensure that the channel is secure before sending sensitive data.
window.plugins.sslCertificateChecker.check(
        function() {
            // success
        }.bind(this),
        function(message) {
          if (message == "CONNECTION_NOT_SECURE") {
            let toast = this.toastCtrl.create({
               message: 'Connection Not Secure. Preventing Authentication.',
               duration: 10000,
               position: 'bottom'
             });

            this.navCtrl.setRoot(HomePage);
            toast.present();
          }
        }.bind(this),
        server,
        fingerprint);
The pinning fingerprint is defined in the /config/keycloak.json file.
+include::https://raw.githubusercontent.com/feedhenry/mobile-security-cordova-template/0c8ccb1e1b01336aba47b596102e89575740d6ce/src/config/keycloak.json[]+Mobile App Self-Defence
| Do: | Do not: |
|---|---|
Detect compromised environments (rooted/jaibreak) at runtime and react accordingly (Ensure the environment is not tampered with) |
Obfuscation is not protection, assume everything in the code is public. (Application code can be deobfuscated) |
Integrity check of the binary (Ensure the app itself is not tampered with) |
|
Verify and check the integrity of dynamic resources (Ensure those resources are not tampered with) |
|
Disable debugging in the application settings (Make sure the app is not debuggable) |
|
Check if the device is in developer mode if supported by platform (Prevent app debugging) |
|
Check if debugger is attached and/or if the process is being traced (Prevent app debugging) |
|
Check lockscreen/passcode is enabled on the device (Make sure device is secure) |
|
Consider blocking access if devices are out of date (Ensure device has no known vulnerabilities) |
|
Verify that the app implements two or more functionally independent methods of root detection. (Use a dual verification approach). |
|
Verify that the app implements multiple functionally independent debugging defences. (Prevent a debugger from being attached that can view app data). |
|
Verify that the app detects, and response to, being run in an emulator using any method. (An emulator can be tampered with more easily than a hardware device). |
|
Verify that the app detects, and responds to, modifications of process memory, including relocation table patches and injected code. (Ensure that the operating environment of the App is safe before running it.) |
|
Verify all executable files and libraries belonging to the app are either encrypted on the file level and/or important code and data segments inside the executables are encrypted or packed. (Sensitive or secret code/resources should be protected.) |
|
Verify that the app implements a 'device binding' functionality when a mobile device is treated as being trusted. Verify that the device fingerprint is derived from multiple device properties. (Improve device identity/integrity). |
|
Verify that if the architecture requires sensitive computations be performed on the client-side, these computations are isolated from the operating system by using a hardware-based SE or TEE. (Sensitive operations should be carried out away from the main processor in a Trusted Execution Environment). |
|
Perform user interaction anomaly detection. (Allows the identification of abnormal app usage by a user that may be malicious). |
|
Consider only starting the app if it is running on the latest version or block requests from old versions of the app. (Older versions maybe have logic or security issues). |
|
Out-of-appstore security updates should be shipped using an encrypted connection. (Ensure that the security patch has not been tampered with in transit). |
|
Ensure that the installation package and its updates shall be digitally signed such that its platform can cryptographically verify them prior to installation. (Verify integrity before applying the update). |
Implementation
Overview
A number of checks were implemented to assess the security of the underlying device running both the Android and iOS template applications.
Android
The Android Template App is using the App Self-Defense Checks that are included in the AeroGear Android SDK.
The main code logic is found under here.
The Security Service is being initialised in the SecureApplicationModule.
@Provides @Singleton
SecurityService provideSecurityService() {
    return MobileCore.getInstance().getService(SecurityService.class);
}
The following code snippets describe the main device trust detection logic in the mobile app.
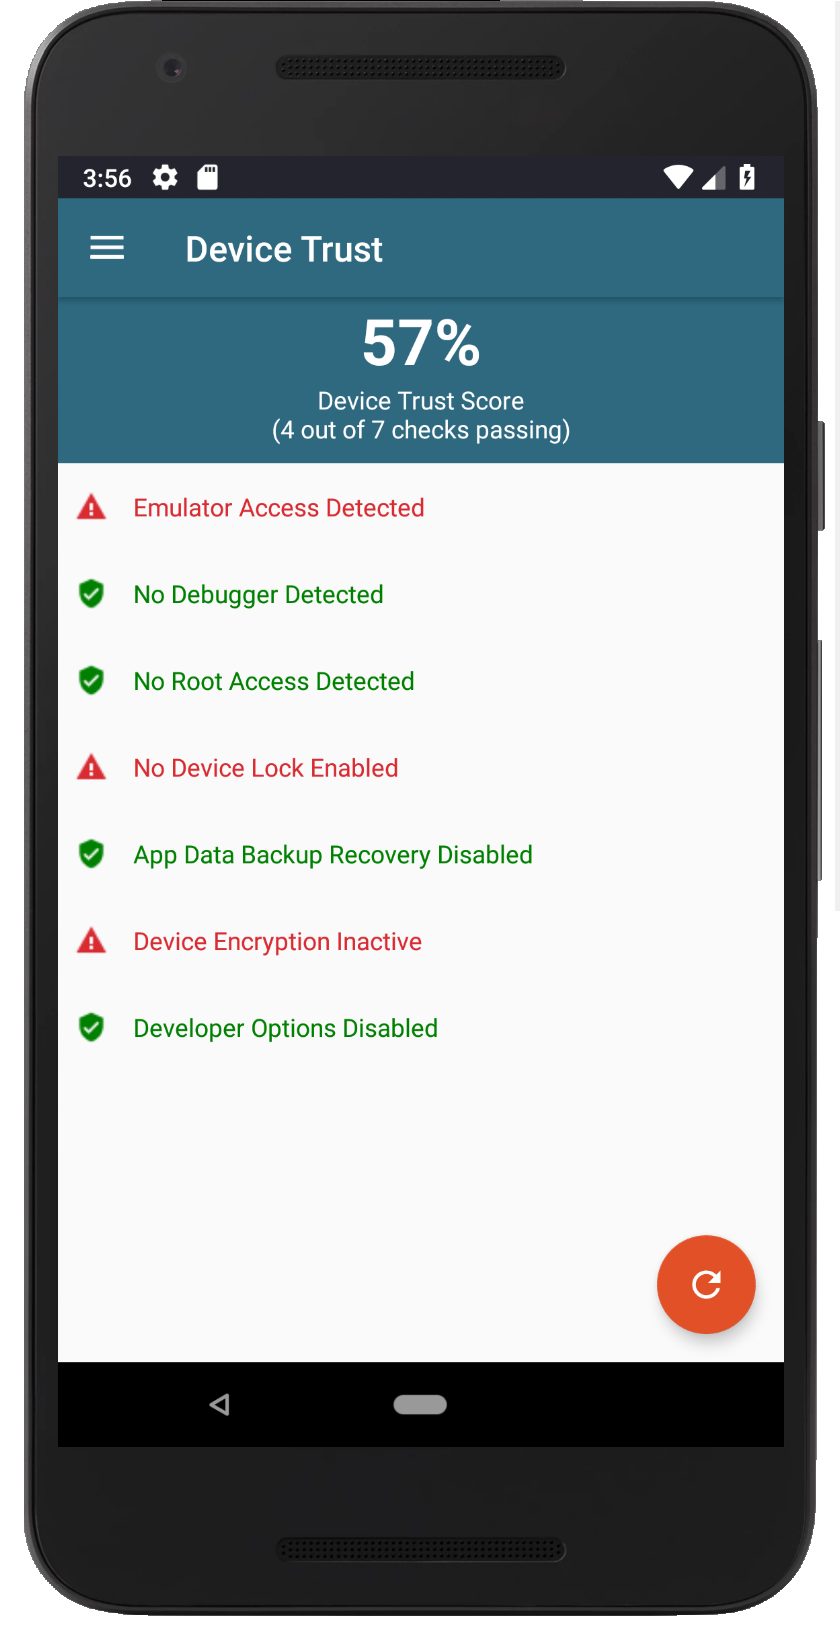
Detecting Root Access
A number of different checks are being used to check if root access is present on the device.
/**
 * Detect if the device is rooted.
 */
public void detectRoot() {
    totalTests++;
    SecurityCheckResult result = securityService.check(SecurityCheckType.IS_ROOTED);
    if (result.passed()) {
        setDetected(rootAccess, R.string.root_detected_positive);
    }
}
Detecting if Lock Screen Set
Detecting if the Android device has a lock screen set (with pin, fingerprint, pattern etc).
/**
 * Detect if the device has a lock screen setup (pin, password etc).
 */
public void detectDeviceLock() {
    totalTests++;
    SecurityCheckResult result = securityService.check(SecurityCheckType.SCREEN_LOCK_ENABLED);
    if (!result.passed()) {
        setDetected(lockScreenSetup, R.string.device_lock_detected_negative);
    }
}
Detecting if Debugger is Attached
Detecting if an Android debugger is attached to the application.
/**
 * Detect if a debugger is attached to the application.
 */
public void debuggerDetected() {
    totalTests++;
    SecurityCheckResult result = securityService.check(SecurityCheckType.IS_DEBUGGER);
    if (result.passed()) {
        setDetected(debuggerAccess, R.string.debugger_detected_positive);
    }
}
Detecting Emulator Access
Detecting if the Application is being run on an emulator.
/**
 * Detect if the application is being run in an emulator.
 */
public void detectEmulator() {
    totalTests++;
    SecurityCheckResult result = securityService.check(SecurityCheckType.IS_EMULATOR);
    if (result.passed()) {
        setDetected(emulatorAccess, R.string.emulator_detected_positive);
    }
}
Detecting Hooking Framework Apps
There are some simple checks added to the application to check if the Xposed Framework or Cydia Substrate are installed on the device, which can be used to attack and tamper with logic in an Android applications.
/**
 * Detect if a hooking framework application is installed on the device
 */
public void detectHookingFramework() {
    totalTests++;
    String xposedPackageName = "de.robv.android.xposed.installer";
    String substratePackageName = "com.saurik.substrate";

    if (checkAppInstalled(xposedPackageName) || checkAppInstalled(substratePackageName)) {
        setDetected(hookingDetected, R.string.hooking_detected_positive);
    }
}
Detecting App Data Backup Enabled
The application can check if the allowBackup flag in the applications AndroidManifest.xml file is set to true. If this flag is set to true, it is possible for an attacker to recover application data from the device without requiring root access.
/**
 * Function to check if the backup flag is enabled in the application manifest file
 */
public void detectBackupEnabled() {
    totalTests++;
    SecurityCheckResult result = securityService.check(SecurityCheckType.ALLOW_BACKUP_ENABLED);
    if (result.passed()) {
        setDetected(allowBackup, R.string.allow_backup_detected_positive);
    }
}
Detecting Out of Date OS Version
The devices OS version can be checked using the Build class to see if the device is not running the latest of Android.
/**
 * Function to check if the device is running the latest Android OS
 */
public void detectLatestOS() {
    // todo: find if there is a better way to define what the latest android version is
    int latestOsApiLevel = Build.VERSION_CODES.M;
    totalTests++;

    if (Build.VERSION.SDK_INT < latestOsApiLevel) {
        setDetected(deviceOS, R.string.device_os_latest_negative);
    }
}
Detecting Developer Mode Enabled
The Developer Mode status can be checked to see if this is enabled.
/**
 * Detect if the developer options mode is enabled on the device
 */
public void detectDeveloperOptions() {
    totalTests++;
    SecurityCheckResult result = securityService.check(SecurityCheckType.IS_DEVELOPER_MODE);
    if (result.passed()) {
        setDetected(developerOptions, R.string.developer_options_positive);
    }
}
Native iOS
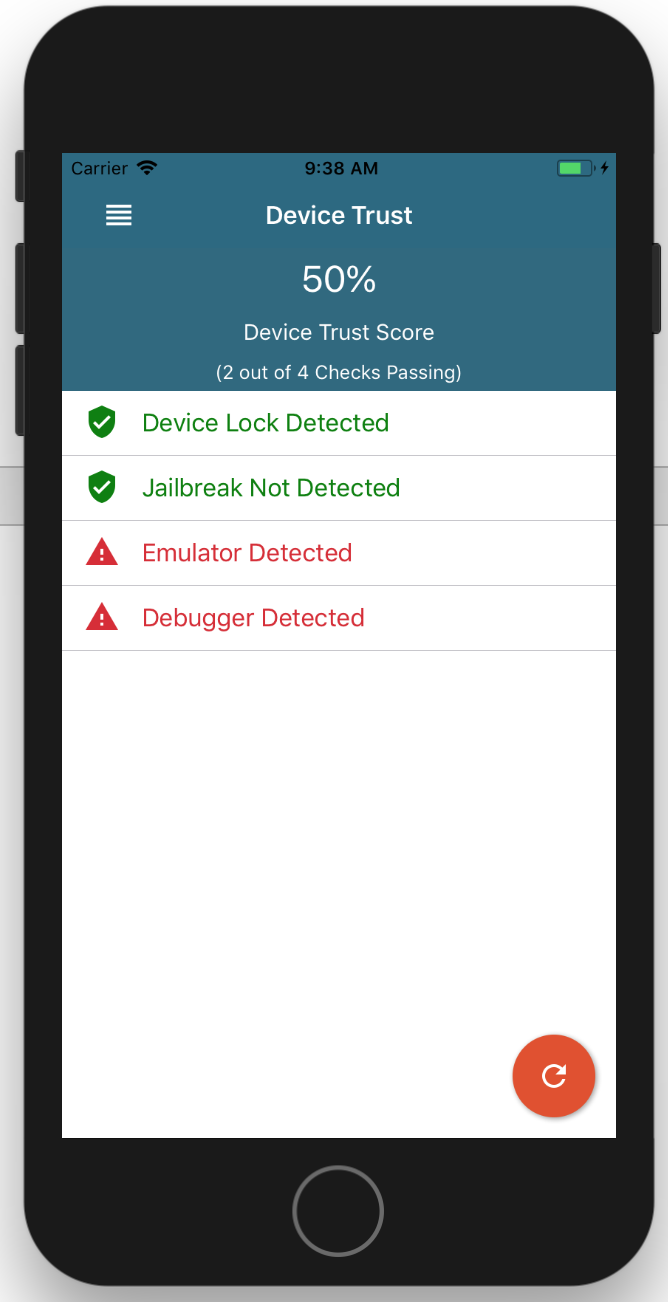
The following code snippets describe the main device trust detection logic in the iOS template app.
Detecting Device Lock
Detecting if the Device has a lock screen set.
/**
 - Check if a lock screen is set on the device. (iOS 9 or higher).

 - Returns: A detector object.
 */
fileprivate func detectDeviceLock() -> Detector {
    let deviceLockSet = LAContext().canEvaluatePolicy(.deviceOwnerAuthentication, error: nil)
    if deviceLockSet == false {
        return Detector(label: DETECTION_DEVICE_LOCK_POSITIVE, detected: true, description: DETECTION_DEVICE_LOCK_DESC)
    } else {
        return Detector(label: DETECTION_DEVICE_LOCK_NEGATIVE, detected: false, description: DETECTION_DEVICE_LOCK_DESC)
    }
}
Detecting Jailbreak
Detecting if the Device is Jailbroken using the DTTJailbreakDetection library.
/**
 - Check if the device running the application is jailbroken.

 - Returns: A detector object.
 */
fileprivate func detectJailbreak() -> Detector {
    if (DTTJailbreakDetection.isJailbroken()) {
        return Detector(label: JAILBREAK_DETECTED_POSITIVE, detected: true, description: JAILBREAK_DETECTED_DESC)
    } else {
        return Detector(label: JAILBREAK_DETECTED_NEGATIVE, detected: false, description: JAILBREAK_DETECTED_DESC)
    }
}
Detecting Debug Mode
Detecting if the device is running in Debug mode.
/**
 - Check if the device running the application is jailbroken.

 - Returns: A detector object.
 */
fileprivate func detectDebugabble() -> Detector {
    #if DEBUG
        return Detector(label: DEBUG_MODE_DETECTED_POSITIVE, detected: true, description: DEBUG_MODE_DETECTED_DESC)
    #else
        return Detector(label: DEBUG_MODE_DETECTED_NEGATIVE, detected: false, description: DEBUG_MODE_DETECTED_DESC)
    #endif
}
Detecting Emulator Access
Detecting if the underlying device running the mobile application is an Emulator.
/**
 - Check if the application is running in an emulator.

 - Returns: A detector object.
 */
fileprivate func detectEmulator() -> Detector {
    #if (arch(i386) || arch(x86_64)) && os(iOS)
        return Detector(label: EMULATOR_DETECTED_POSITIVE, detected: true, description: EMULATOR_DETECTED_DESC)
    #else
        return Detector(label: EMULATOR_DETECTED_NEGATIVE, detected: false, description: EMULATOR_DETECTED_DESC)
    #endif
}
Detecting Outdated OS Versions
Detecting if the underlying device running the mobile application is running an old version of iOS.
/**
 - Check if the device is running the on the latest version of iOS.

 - Returns: A detector object.
 */
fileprivate func detectLatestOS() -> Detector {
    if #available(iOS 11.0, *) {
        return Detector(label: LATEST_OS_DETECTED_NEGATIVE, detected: false, description: LATEST_OS_DETECTED_DESC)
    } else {
        return Detector(label: LATEST_OS_DETECTED_POSITIVE, detected: true, description: LATEST_OS_DETECTED_DESC)
    }
}
Apache Cordova
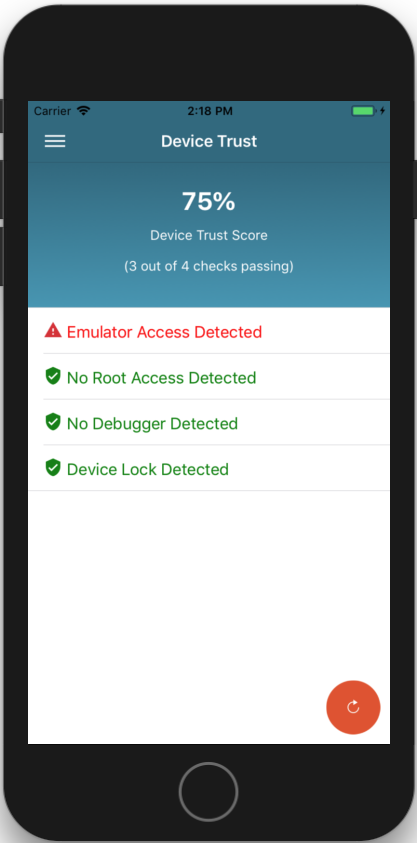
The following code snippets describe the main device trust detection logic in the Cordova template app.
Detecting Emulator Access
Detecting if the underlying device running the mobile application is an Emulator.
/**
* Detect if the device is running on an emulator.
*/
detectEmulator(): void {
  if(device.isVirtual) {
    this.addDetection("Emulator Access Detected", true);
  } else {
    this.addDetection("Emulator Access Not Detected", false);
  }
}
Detecting Root/Jailbreak
Detecting if the underlying device is Jailbroken or has Root Access.
/**
* Detect if the device is running Root.
*/
detectRoot(): void {
  var self = this;
    IRoot.isRooted(function(rooted) {
      if(rooted) {
        self.addDetection("Root Access Detected", true);
      } else {
        self.addDetection("Root Access Not Detected", false);
      }
    }, function(error) {
      console.log(error);
    });
}
Detecting Debug Access
Detecting if the application is built in debug mode.
/**
* Detect if the app is running in debug mode.
*/
detectDebug(): void {
  var self = this;
  cordova.plugins.IsDebug.getIsDebug(function(isDebug) {
    if(isDebug) {
      self.addDetection("Debug Access Detected", true);
    } else {
      self.addDetection("Debug Access Not Detected", false);
    }
  }, function(err) {
      console.error(err);
  });
}
Detecting Device Lock Set
Detecting if the underlying device has the device lock set.
/**
* Detect if a system device lock is set.
*/
detectDeviceLock() {
  this.pinCheck.isPinSetup()
  .then(
    (success) =>  { this.addDetection("Device Lock Enabled", false)},
    (error) =>  {this.addDetection("Device Lock Not Enabled", true)}
  );
}
Handling Sensitive Data Overview
Do: |
Do not: |
Sensitive data should stay in RAM for as little time as possible (Prevent data leak) |
Send sensitive data over alternate channels (e.g, SMS, MMS, or notifications) (They are not encrypted) |
Address Space Layout Randomization (ASLR) should be taken advantage of (Limit the impact of attacks such as buffer overflow) |
Encryption keys remain in RAM during the instance lifecycle of the app. (Prevent the key from being read from memory) |
minimize the use of APIs that access sensitive or personal user data (Prevent data leak) |
Write data to log files (Other applications can access the log data) |
Consider using a hash or non-reversible form of the data (To protect the original data) |
Store/cache sensitive data on the device (It can be leaked) |
minimize the frequency of asking for user credentials. Instead use an authorization token and refresh it (Less chance of exposing user credentials) |
storing/logging GPS data (Protect user privacy) |
Use secure POST to send user data, with XSRF token protection (Query params in URL are logged) |
Sending crash logs over the network in plaintext (Can contain sensitive info) |
Add an additional layer of verified, third-party encryption (e.g., SQLCipher) to the data as device encryption is not sufficient (Extra layer of protection) |
Cryptography Summary
| Do: | Do not: |
|---|---|
Apply cryptographic standards that will withstand the test of time for at least 10 years into the future |
Including the keys in the same attacker-readable directory as the encrypted content |
Use NIST FIPS-validated crypto modules |
Use of hardcoded keys within the binary |
Use NIST approved or NSA approved key management technology and processes |
Creation and Use of Custom Encryption Protocols |
Recommended minimal key lengths and algorithms Key exchange : Diffie–Hellman with a minimum of 2048 bits Message Integrity: HMAC-SHA2 (or HMAC-SHA-256) Message Hash: SHA2 256 bits Asymetric encryption: RSA 2048 bits Symmetric-key algorithm: AES 128 bits (CBC or GCM) Password Hashing: PBKDF2, Scrypt, Bcrypt |
Use of Insecure and/or Deprecated Algorithms, like RC2, MD5, MD4, SHA1 |
Use the same cryptographic key for multiple purposes |
|
Random values are generated using a sufficiently secure random number generator |